With my third, and final, baby on the way, it was time for a nursery renovation. I had recently moved my sons into a new room that I recently renovated with an affordable slat wall and had plans to make their old room into the nursery. The first step to my nursery room renovation was the board and batten wall (after clearing out the room, or course).
Planning and Design
I will often do little planning for my projects and just make it up as I go. Since I wanted the board and batten to wrap all the way around the room, I felt as though it was necessary to plan it out. Being an engineer, I am very efficient with design software. I figured it would be quickest and most accurate if I designed the room using a 2D software.
The first step was laying out the entire room. Below you will see my drawing that has each wall shown. Along with the walls, I showed the doors, windows and baseboard. For the door and window measurements, I used the dimensions to the outside of the trim.

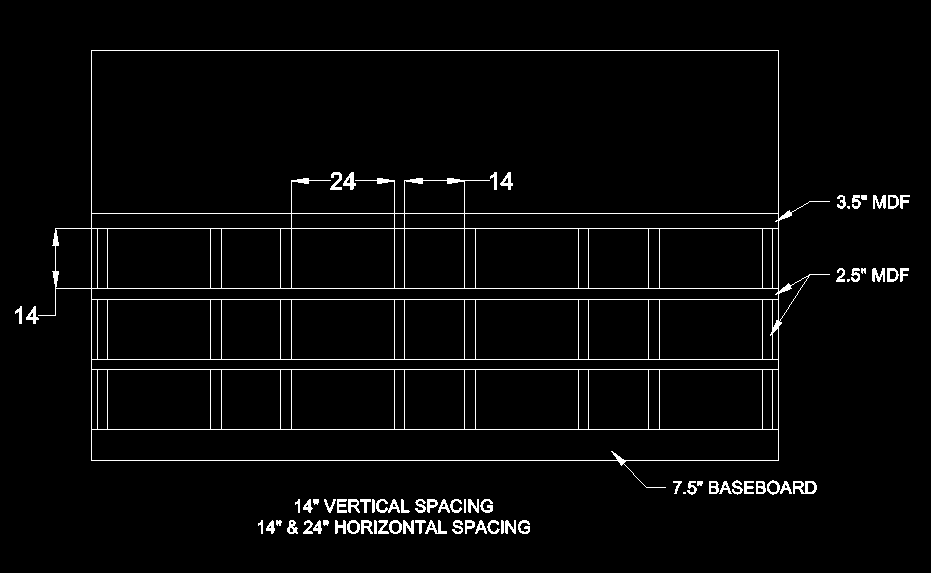
I chose to use 14″ vertical spacing (based on how high I wanted it on the wall). I wanted to change it up a little with the horizontal spacing, so I used both 14″ and 24″ horizontal spacing.
Once I decided on the spacing, I drew in the horizontal members. I used 3.5″ MDF for the top piece and 2.5″ MDF for everything else. I then drew the vertical members with the two different spaces. I spaced the entire room based on the main feature wall (the wall without any doors or windows). After the wall was laid out across the entire room, I made a few minor adjustments until I loved the overall layout.
Now that I had my plan, it was time to begin! I kept this drawing open on my computer during the installation so that I could reference it and pull dimensions, if necessary.
Install Board and Batten
**This post contains affiliate links to products that I recommend. If you purchase something through an affiliate link, I may receive a small percentage of the sale at no extra cost to you. I really appreciate your support.**
I cut as many pieces as possible before I began using a miter saw. I decided to make the horizontal pieces as long as possible, which meant I would need to cut several 14″ pieces for the verticals.
I secured the MDF to the wall using both construction adhesive and finishing nails (I used my finish nailer for a quick installation). The construction adhesive will ensure that the MDF is nice and secure. If you think you might want to remove the board and batten wall in the near future, it might be best to skip the construction adhesive. I say this because I tend to change things up a lot. However, I do love this design and know it can easily be changed with paint.

I began each wall with a vertical piece. I leveled this piece before I secured it to the wall (the level is resting on the baseboard, which is clearly not level).

Once I had the first vertical piece in place, I installed the long horizontal piece. I also made sure this piece was level before I secured it to the wall. I then installed the remaining vertical pieces using spacers. I made both a 14″ and 24″ spacer and alternated between the two (you can see a picture of the two spacers below).
Since my baseboards are not level and I installed the horizontal piece level, I needed to custom cut each vertical piece on the first row. Each of these pieces were slightly different as the spacing would varied across the wall.

All other vertical pieces did not need to be custom cut, which made the installation much quicker. I was able to cut several 14″ pieces at a time.

For the horizontal members, all joints were done on a 45 degree angle. This included the corners and the pieces on the wall that was longer than 8′. In order to ensure that the two pieces lined up properly, I used a clamp to secure them before nailing them to the wall.

The installation moved rather quickly once I made it through the first row of vertical pieces.

Using spacers to install the vertical members definitely made it go faster. I couldn’t imagine individually measuring the distance for each piece. I decided to make the spacers out of wood so I didn’t get them mixed up with the primed MDF.

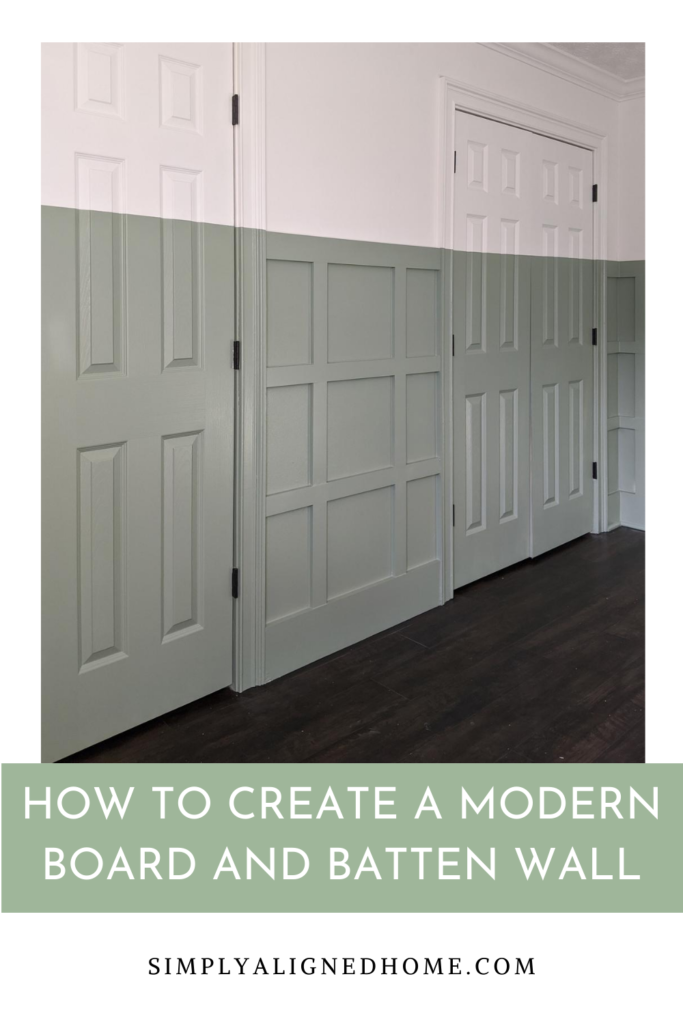
I love this board and batten wall with a modern twist! It would be a great accent even if I just left it white.

Here is one space that I decided to change the layout of the original design. Instead of following the pattern as it would have fallen on this wall, I decided to center the squares between the two closet doors (the center spacing is still 14″).

It’s incredible what you can do with some MDF and the right tools! I’m so excited about how this nursery is turning out!

Caulk and Spackle Everything
After all of the MDF was installed, it was time to caulk and spackle everything. I started by caulking all of the seams between the wall and MDF. I used a paintable white caulk. I apply a small bead of caulk and smooth it out with my caulk finisher tool. This little tool is very affordable and has saved my fingers on many projects…I highly recommend it for any projects that require caulk!

Next up was the spackle! I like to use DryDex Spackling. It goes on pink, so you can see where you applied it, and dries white. I apply a little more than necessary to all seams and holes. This way, I will not have indentations if it does shrink a little as it dries.

I allowed both the caulk and the spackle to dry before I sanded down the spackle. Once everything was dry, I used my Gator 220 grit sanding sponge. I chose not to use my orbital sander because it makes a bigger mess than hand sanding. Smoothing the spackle out simply requires a light sanding.

I did vacuum and wipe everything down once I was done sanding. Sanding spackle does create a good bit of dust.
Paint Prep
Have you ever heard the saying that not all tape is created equal?? I definitely think that’s true! I have tried several different types of painters tape and none of them have performed like Frog Tape. I get nice crisp lines every time I use Frog Tape. It does cost a little more than other painters tapes, but I think it’s totally worth it!
I applied Frog Tape just above the board and batten wall all the way around the room.

I spent lots of time considering all of my option on how to paint the closet doors. I considered painting them white, black (like the other rooms in our house) or the same color as the board and batten wall. Ultimately, I decided to think outside of the box and try something new! I’ll be honest…I was a little nervous about my decision, but it’s just paint and I can always change it if I didn’t like it.
In order to ensure the line was straight across the doors, I started by putting a piece of another painters tape on the doors. I made sure to align the tape with the pieces of tape that were already on the door frame. I then applied the Frog Tape to the door just above the other tape. It was important to get the painters tape in all of the creases of the door.


After I had all of the Frog Tape applied, it was time for plastic! I have found that it’s easier to tape for clean lines and then tape the plastic. It’s really difficult to get nice tape lines when also trying to tape the plastic.

I made sure that the plastic covered from the top of the board and batten to the crown molding. I also covered every inch of the floor. Spraying does require more prep than painting with a brush and roller. It is important to cover all areas that you don’t want to get paint on. I have sprayed rooms before and ended up with paint dust throughout our home..

Spray the Board and Batten
I decided to spray the board and batten wall for two reasons. One, you get a much better and even finish when spraying. It never fails, I always end up with brush strokes or roller lines. Two, painting all of the seams of the board and batten would take forever! I would have to paint all seams with a brush and then use a small roller to paint the faces.
For this project, I’m using my Wagner FLEXiO 3000…which I love! It’s super easy to use and breaks down for a quick cleanup.
Using the sprayer, I focused on one section at a time working from top to bottom, then down the wall. Painting the corners of each panel first made sure I had good, even coverage. After each section was complete, I would finish with a quick coat along each of the MDF vertical and horizontal pieces.

The Finished Product
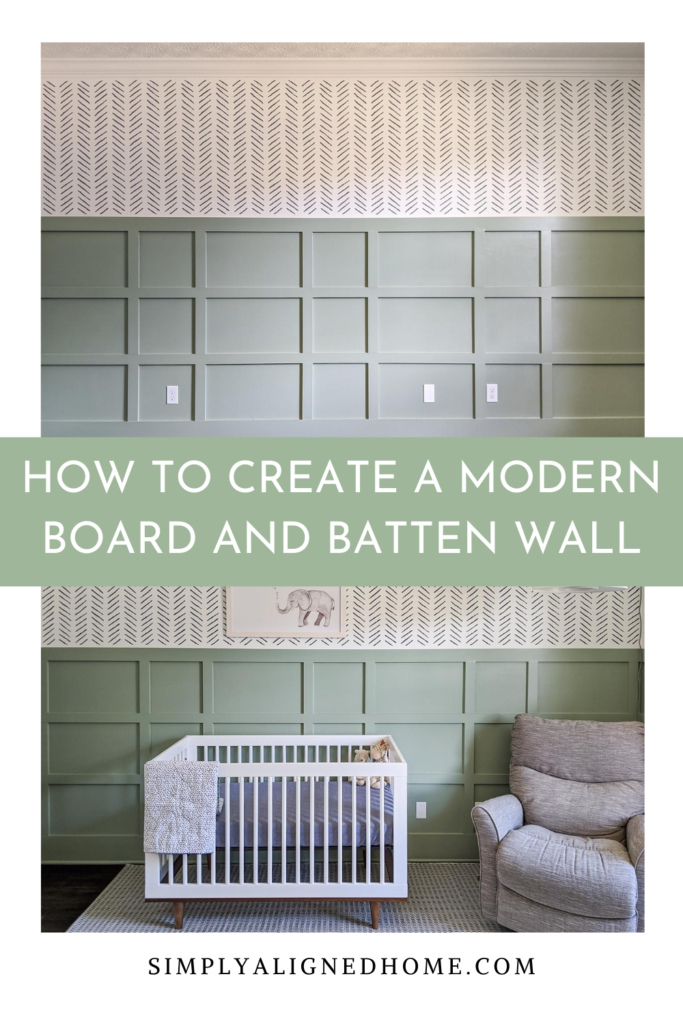
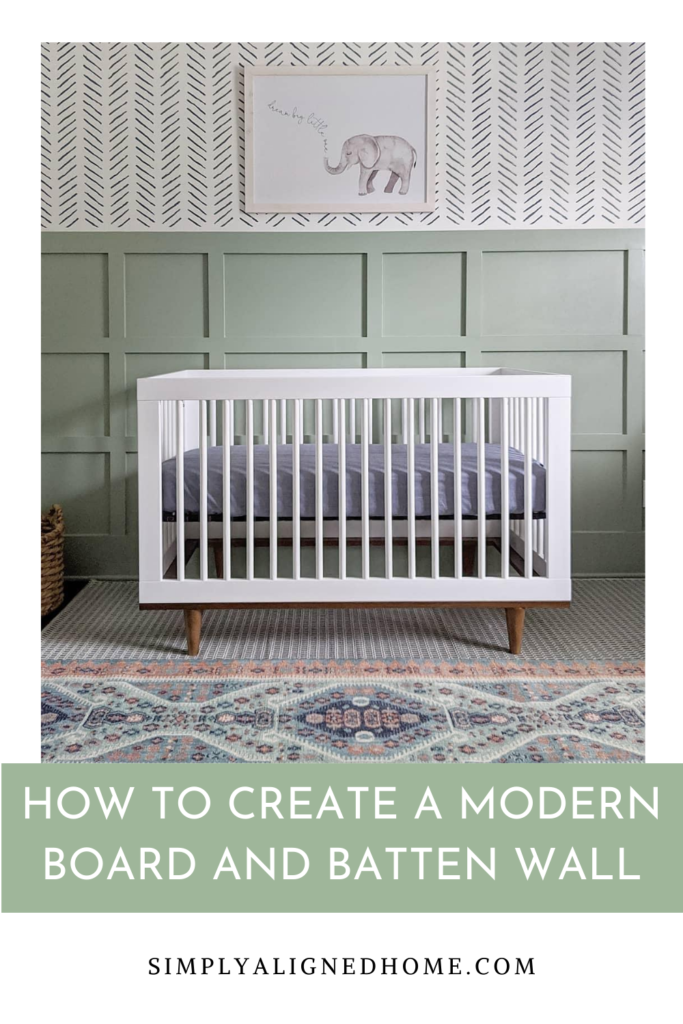
I absolutely love how the board and batten walls turned out! Wrapping it around the room made it feel more cohesive and framed out the space.
I chose to paint the board and batten with Sherwin William’s Coastal Plain paint. I’ve used this paint on several projects throughout my home and honestly can’t get enough of it!

I could not be happier with my color blocked doors! I am so glad I took a chance on it! It not only makes a statement, it also makes the wall feel more cohesive and less broken than if I had painted the doors a solid color.

Let’s Talk Money
Most of my projects are budget friendly, if you perform the work yourself. It’s incredible how much you can spend in labor and markups when using a contractor. Personally, I feel as though it’s best to install simple wall treatments such as board and batten walls yourself if you have the tools, time and energy.
In the past, I haven’t shared much about the actual cost of my projects. Moving forward, I’m hoping to be able to share rough costs, at least for my smaller projects. So, here is a rough breakdown of what it would cost to install and paint the board and batten wall. I have excluded tools such as paint brushes, painters tape, nail gun, etc. You might be surprised how nice a project can look while still being affordable.
- MDF: $58
- Construction Adhesive: $8
- Finish Nails: $12
- Caulk: $12
- Paint: $30
- TOTAL: $120
The board and batten wall added great dimension and warmth to this room. It’s incredible what some MDF and paint can do for a space! Once the board and batten wall was complete, I decided to stencil the main feature wall. Be sure to check out my post on how I stenciled this wall! I absolutely love how this room turned out! Head over to my nursery reveal to see the finished space!
If you need help with an accent wall design, email me: simplyalignedhome@gmail.com. For more projects and inspiration, follow me on Instagram and Pinterest…I’m always working on something new!

**Note: I am not a professional and do not claim to be an expert. Please be sure to always read instructions for all tools and products. Safety is very important and should be your top priority. Wear necessary protection when using tools (eye wear, hearing protection, gloves, etc.) and dust masks when sanding or cutting. Simply Aligned Home is not responsible for any injury or damage. All of my designs are not professionally designed and are for private use only.**