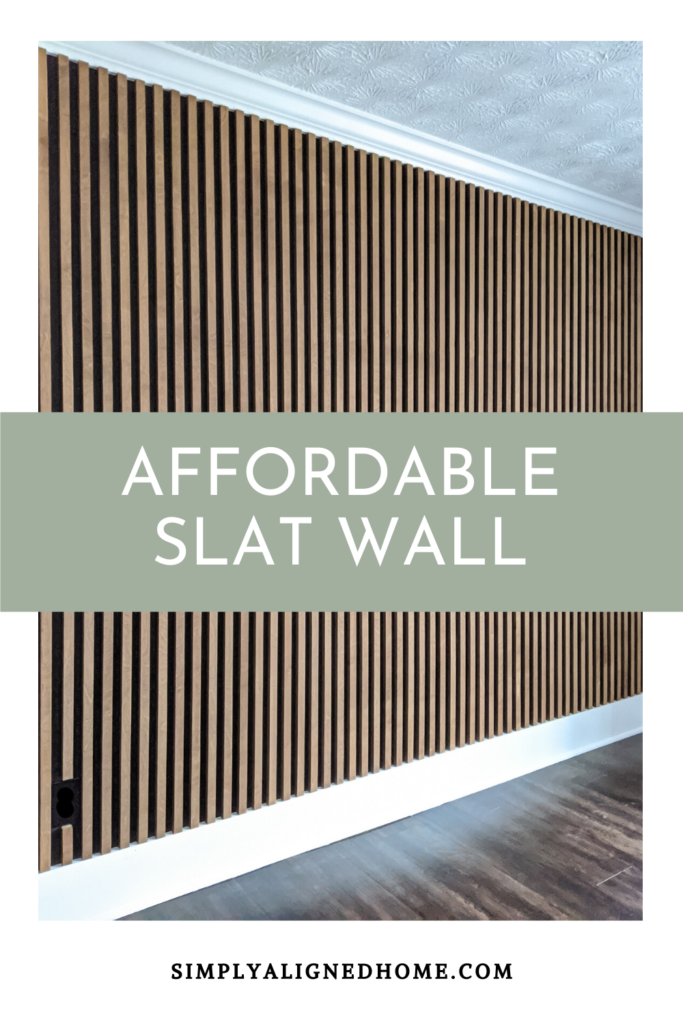
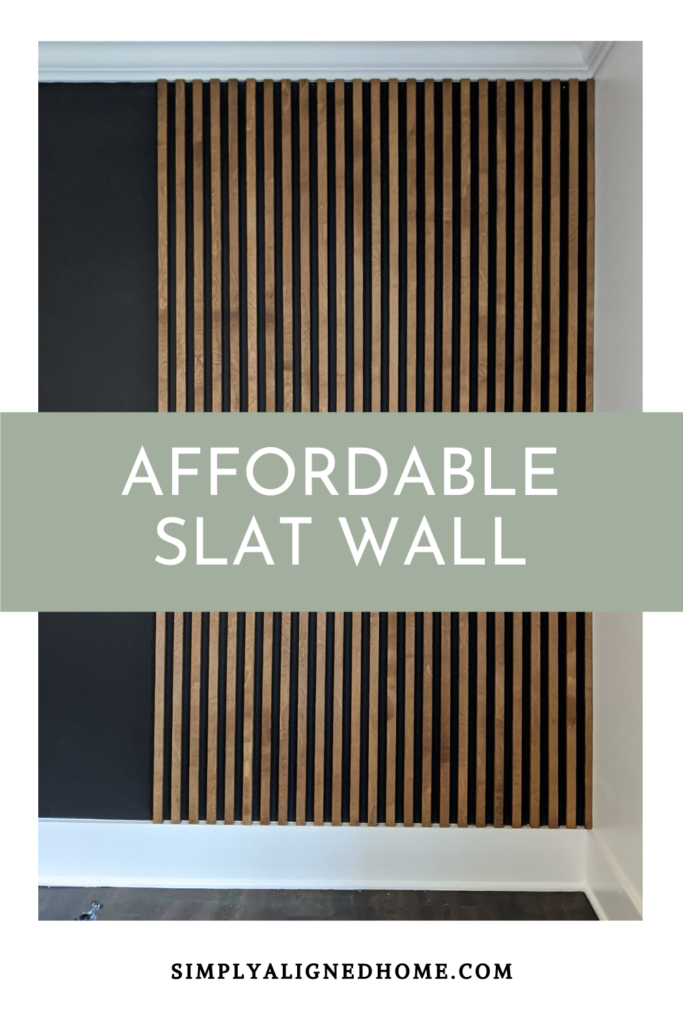
Ever since the first time I saw a wood slat wall, I couldn’t wait to add one to my home! I have seen many different styles (plain wood against a white wall, painted wood on a painted wall…) and wanted to try something slightly different. I absolutely love black accent walls, like the one that I have in my master bedroom, but didn’t want the entire wall black. That’s when I decided on a black wall with stained wood slats!
My next obstacle was justifying the cost of a wood slat wall. I am big on budget friendly home renovations and this was no exception. The wall I wanted to install the slats on was rather large and the cost of wood started to add up. Therefore, I decided plywood was a cost effective alternative.
**This post contains affiliate links to products that I recommend. If you purchase something through an affiliate link, I may receive a small percentage of the sale at no extra cost to you. I really appreciate your support.**
Determine Amount and Type of Plywood
In order to determine how much plywood I would need, I had to do a little math (which oddly is one of my favorite parts of my projects). I wanted my slats and spacing to be the same width. For easy of planning, I decided on 1″ wood slats and spaces. I divided the width of the wall by two and this was the total number of slats that I would need.
In order to account for waste from the saw blade cuts and to make sure I had a few extra slats, I purchased two pieces of 3/4″ x 4′ x 8′ birch plywood. I chose to use birch plywood since I would be staining it. Any stain grade plywood would work.
Cut the Plywood
I had my local hardware store cut the plywood in half when I purchased it. This made it easier for me to handle.

Luckily, I had a little help from my husband when cutting the plywood. A second set of hands is super helpful when running plywood through a table saw! We cut both sheets of plywood into 1″ slats.

Safety is obviously key when working with power tools. It is very important to keep your hands away from the saw blade and use a push stick or pushblock with the table saw. We were extra careful when we got to the last few slats on each piece of plywood.

Sand the Plywood
I started by sanding the cut edges of the plywood. I mainly wanted to get rid of the rough edges since I knew it would be nearly impossible to make them smooth. It was easiest to line all of the pieces up and sand them at once using my orbital sander.

As soon as the top and sides were sanded, I hand sanded the edges with a sanding sponge to smooth them out. I didn’t bother sanding the face of the plywood that would be up against the wall.

Paint the Wall
Since most of the paint would be covered by the slats, I want concerned about the quality of paint. I used a cheap matte black paint and applied two quick coats to the accent wall. I allowed the paint to dry before installing the wood slats.

Stain the Plywood
Sometimes I wonder why I bother venturing away from my go-to products.. For the stain, I purchased a Golden Oak color thinking that I wanted a light stain. I tested a piece of the plywood in the room and ultimately decided it was too golden against our dark floors. Therefore, I went with my favorite stain, Special Walnut (which I should have chosen in the first place).

I started by lining up several slats on their side. I used a paint brush to apply stain to the two cut sides first. The brush did a much better job of getting stain in all of the cracks than a rag. These sides really sucked up the stain.

Once the sides were stained, I applied a light coat of stain to the front surfaces using a rag. I allowed the stain to dry overnight.

If I were smart, now is when I would have sealed the plywood…but I decided to wait until it was on the wall.

Cut the Slats to Length
Since no wall in my house is straight, I did not expect this wall to be an exception. Therefore, I only cut a handful of slats at a time. I cut the length of the wood slats using a miter saw. I installed those slats and then cut the next batch. This ensured that the slats weren’t too long or short.
Install the Slats
I’ve found that it’s easiest to install repeating trim work if I use a spacer. For the slat wall, I cut one of the slats slightly shorter than the rest and used it as a spacer. This would ensure that the wood slats and spacing were the same. The spacer was cut shorter than the slats so that it would be easier to remove once the slat was installed.

To secure the slats to the drywall, I used both construction adhesive and my finish nailer. I applied several small dots of construction adhesive to the wood slat and then nailed it to the wall, making sure the spacer was tight between the two slats. I put the nails in at a slight angle and alternated directions (left to right). Once the slat was secure, I removed the spacer and moved on to the next!


Cut around Any Outlets
I had one outlet and one blank cover plate on the accent wall. Luckily, the slats were spaced perfectly to where I only needed to cut one slat per plate cover. For these, I simply cut out enough of the slat to install the covers.

Seal the Wood Slats
As I said earlier, it would have been much easier to seal the slats before I installed them on the wall. Using a brush, I applied a quick coat of polyurethane with a satin finish to the front surface of each slat.
Air Out the Room
Just a fair warning…the stain from the slat wall did smell for quite a few days after installing it. I aired the room out, used an odor absorber, and made sure the smell was gone before I allowed my sons to sleep in this room. If you are not able to keep the room clear until the smell dissipates, I recommend allowing the stained wood slats to cure elsewhere before you install them.
Enjoy the Beauty of the Wood Slat Wall
The finished slat wall was quite satisfying…it made the room feel much more rich. I loved it so much that I decided to extend the slat wall to the area around my bay window! The slat wall and bay window treatment made my boys’ bedroom look amazing!!

Now all I need to do is find another place to install a slat wall! I think I’m just a little obsessed…
For more projects and inspiration, follow me on Instagram and Pinterest…I’m always working on something new!

**Note: I am not a professional and do not claim to be an expert. Please be sure to always read instructions for all tools and products. Safety is very important and should be your top priority. Wear necessary protection when using tools (eye wear, hearing protection, gloves, etc.) and dust masks when sanding or cutting. Simply Aligned Home is not responsible for any injury or damage. All of my designs are not professionally designed and are for private use only.**
Materials Used
Tools Used