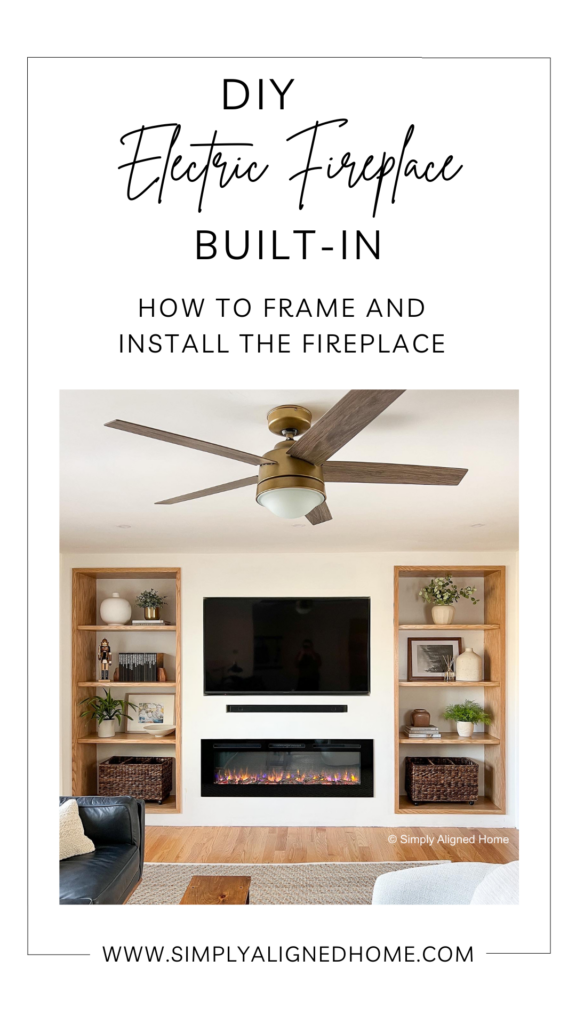
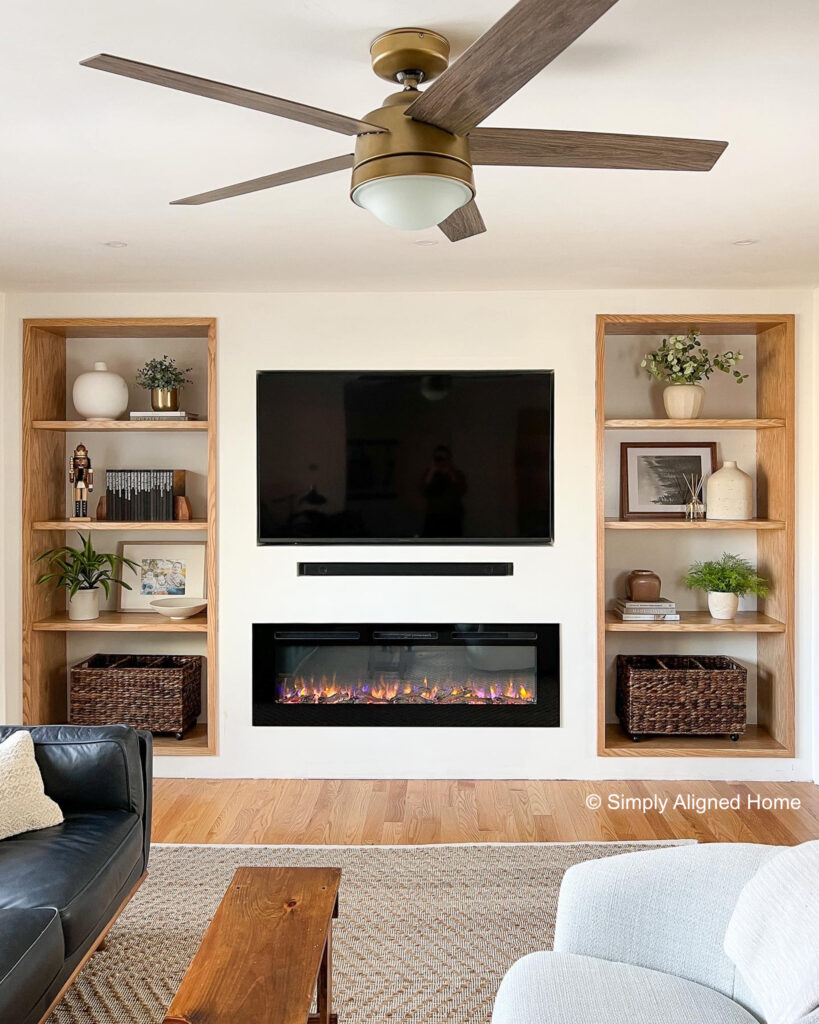
My family and I recently moved across the country and purchased a split-level home. The first project that I did in the new home was a kitchen expansion. I took a small, closed off kitchen and made it into a large, open concept kitchen and shared space with a living room. The living room really needed a fireplace built-in to make it more cozy and tie it into the kitchen. Here’s how I quickly and easily framed the wall and installed the electric fireplace for this fireplace built-in!
The second part of this build was building and installing the bookcases. The details for bookcases can be found in this post: How to Build and Install the Bookcases.
**This post contains affiliate links to products that I used or recommend. If you purchase something through an affiliate link, I may receive a small percentage of the sale at no extra cost to you. I really appreciate your support!**
ELECTRIC FIREPLACE | SOUND BAR | TELEVISION | TELEVISION MOUNT | HUNTER CEILING FAN | AREA RUG | LARGE HANDWOVEN BASKET
Dimensions
The most frequently asked questions about my electric fireplace built-ins are about dimensions…so lets jump straight to that!
- The overall width of this wall is 158″ (just over 13′). Our ceilings are 8′ tall.
- The bookcases are roughly 38″ wide and 16-1/2″ deep including the trim.
- The width of the center part of the built-in is roughly 74″ wide (trim of bookcase to trim of bookcase).
- The television is 65″ and the electric fireplace is 60″ wide.
Determine a Layout
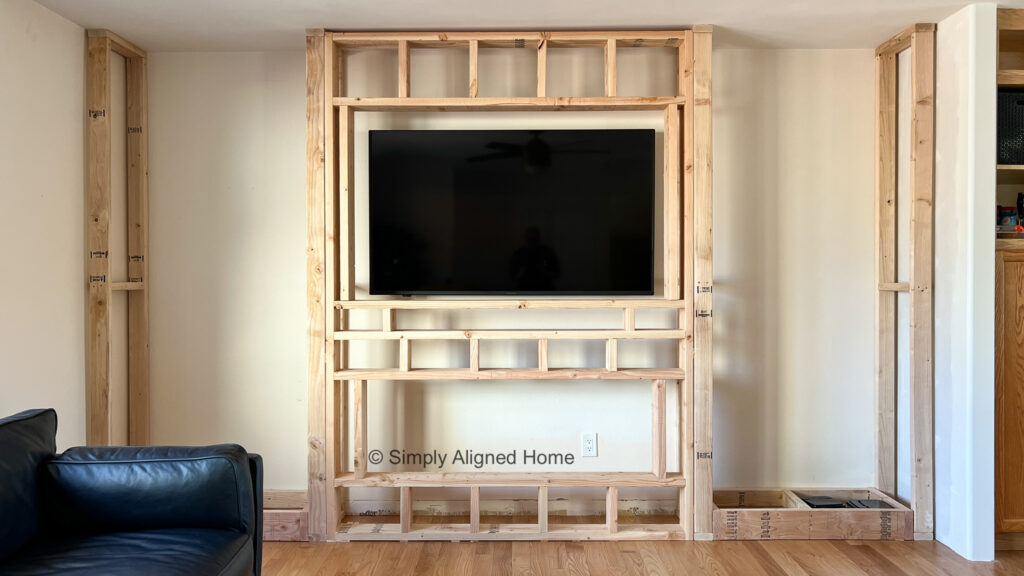
The first step in making my fireplace built-in was to determine a layout. I personally based mine on the width of our television. I knew that I wanted the center of the built-in unit to extend a few inches beyond the TV on either side. That determined the width of the center structure for the built-in (which ended up being roughly 74″ wide).
Once I had the width of the center unit, I was able to determine the width of the bookcases on either side of the built-in. I wanted the bookcases to be deep enough to hold large decor. The bookcases ultimately determined the overall depth of the built-in. I will cover all of the details of the built-in bookcases in another blog post.
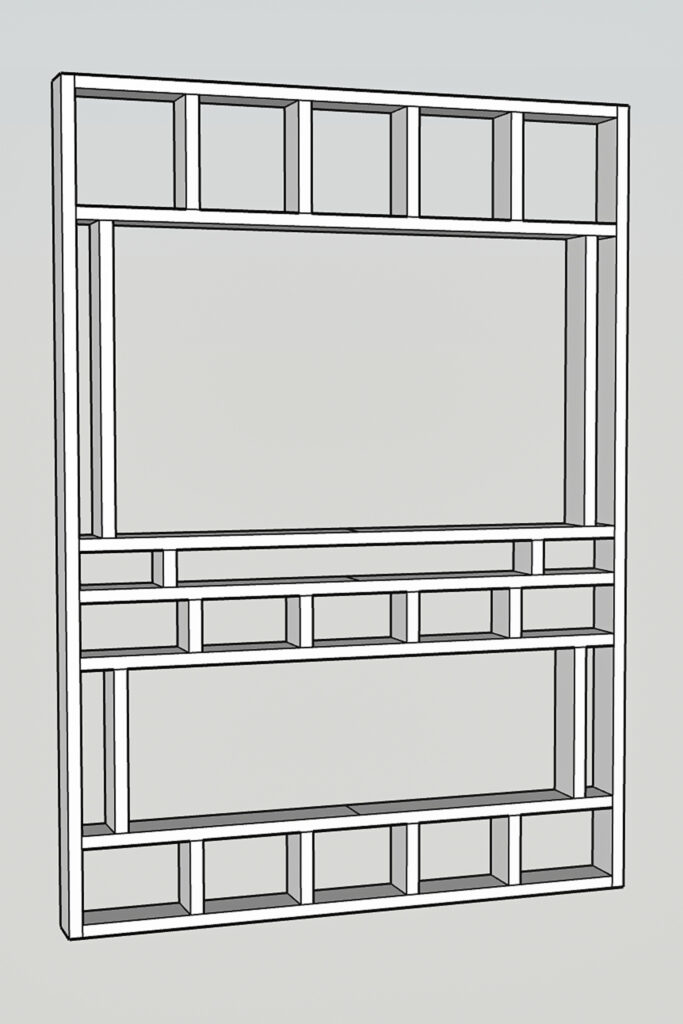
The next thing I needed to figure out was the vertical spacing for the center unit. This was mainly based on the electric fireplace requirements. My electric fireplace did not have any height requirements for below the fireplace (it could sit on the floor if I wanted it to), but it did have requirements for the items above the fireplace.
I had to leave 8 inches of space between the top of the fireplace and the bottom of the TV or any other items. This would reduce damage from the heat coming out of the vent at the top of the fireplace.
My fireplace built-in featured an inset television. The face of the TV is flush with the drywall on the front of the built-in. Since I was going to do an inset television, I wanted to add a soundbar. Therefore, the soundbar needed to be 8 inches above the top of the fireplace.
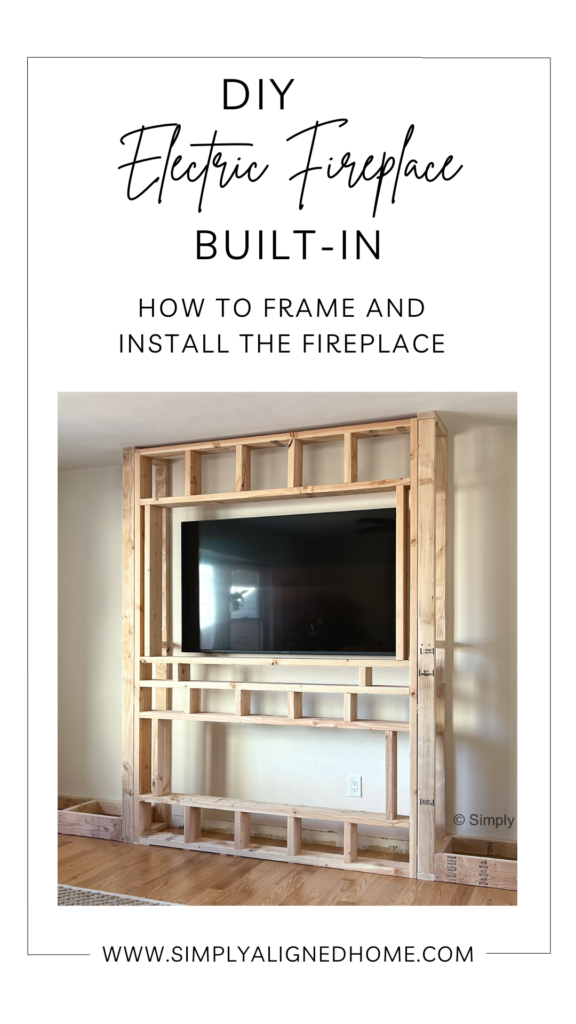
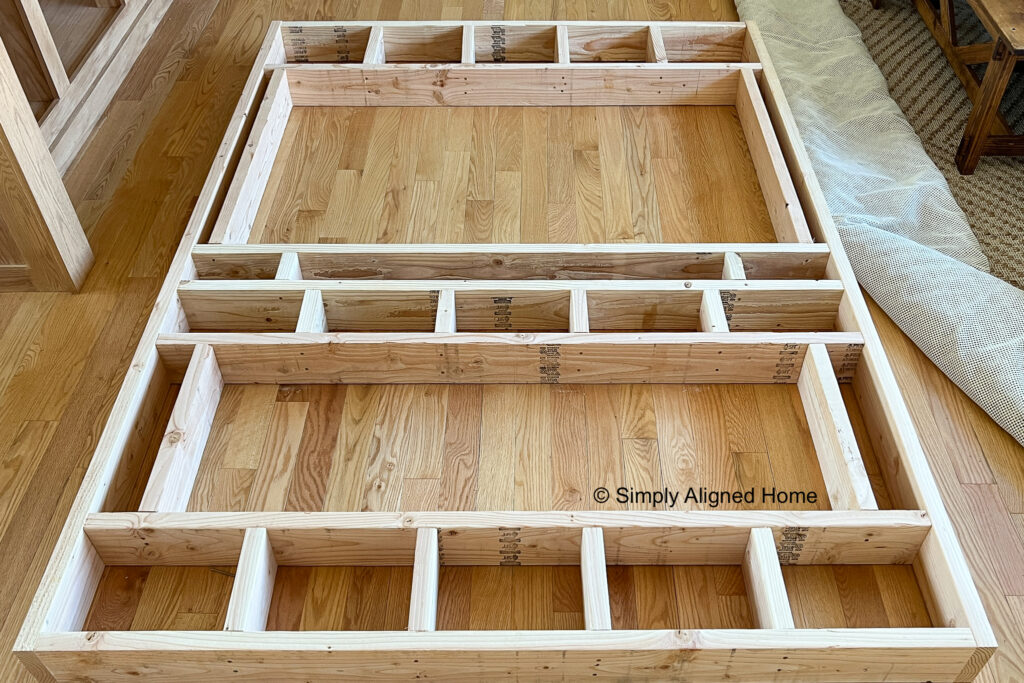
I ultimately came up with a design where the fireplace sits 10-1/2″ off of the floor. The soundbar is 9″ above the top of the fireplace and there is one 2×6 between the soundbar and bottom of the TV opening. Here is what the middle framing section will look like:
Build Framing for Electric Fireplace and Bookcases
Television and Electric Fireplace Framing
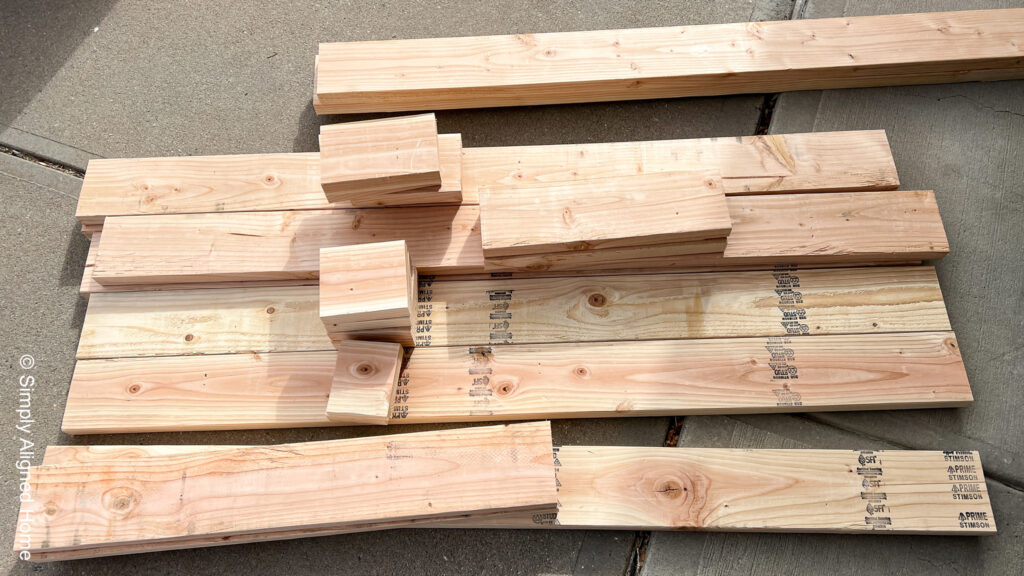
The instructions for my electric fireplace stated that the framing should be made from 2×6 lumber. The 2×6’s will support the full depth of the fireplace. It is important to read all of the materials provided with your electric fireplace before building the framing.
With something like this (when I’m fairly certain that my measurements are correct), I like to make all of my cuts before I begin assembling. I cut all of my 2×6’s to create the framing structure using my miter saw and laid it out on my living room floor.
I like to work smarter not harder. For something like this, I like to build the structure close to where it will be installed. This will eliminate the struggle of carrying the structure through my house, up stairs and around corners. I can simply tip it up and slide it into place.
Once everything was in place, I began assembling the structure. I did this using 3-1/2″ construction screws. I secured the horizontal members to one of the outside vertical members and worked my way from the bottom to the top of the structure. The final piece was securing the other outside vertical member to the horizontals.
Bookcases Framing
The framing for the bookcases was much simpler than the framing for the television and electric fireplace. I started by making two verticals per bookcase out of 2×4’s.
For the base of the bookcases, I simply made a 2×6 structure (I used a 2×4 for the back and center support because I ran out of 2×6’s). It was the width between the two verticals and 16″ deep.
Install Framing for Electric Fireplace and Bookcases
Bookcases Framing
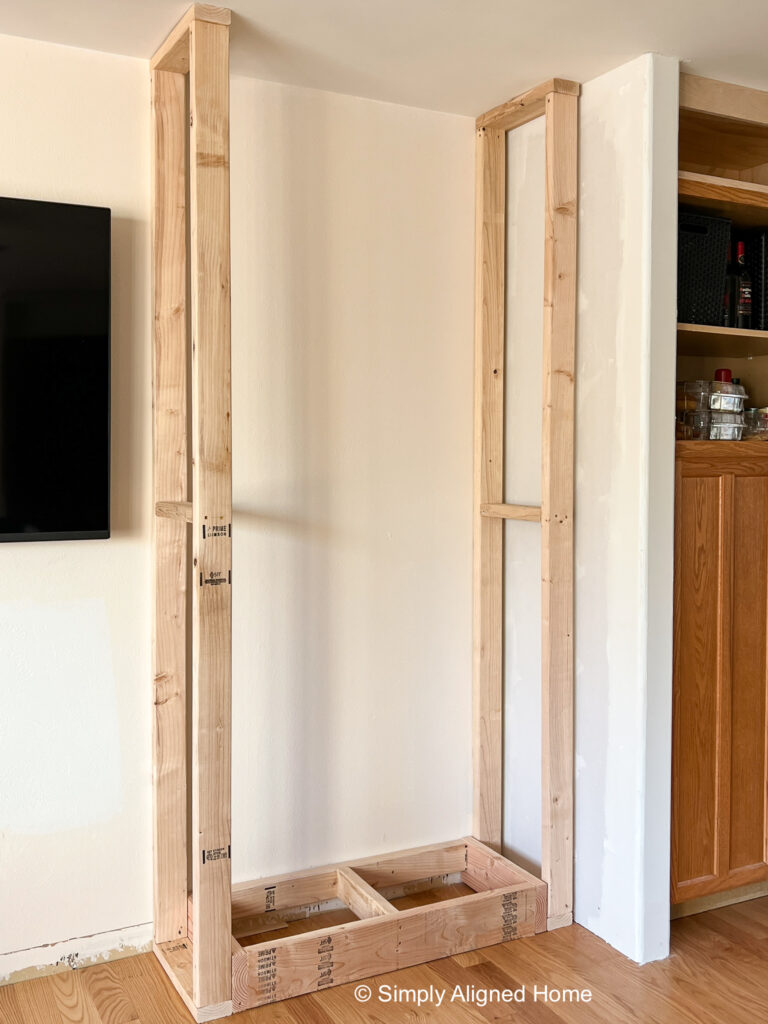
I started by installing the outside vertical structures. I set them in place, making sure they were level and plumb and before I secured them to the floor and studs.
Next, I installed the bookcase base structures. I leveled them and secured them to the studs. I also secured the vertical structures to the base. The last piece was adding the inside vertical members.

Television and Electric Fireplace Framing
With the bookcase framing in place, the last part of framing was the center part for the television and electric fireplace. Once I had the structure assembled, I stood it up and slid it into place.
I clamped it to the vertical bookcase supports to ensure that it wouldn’t fall over while I leveled it and secured it in place.
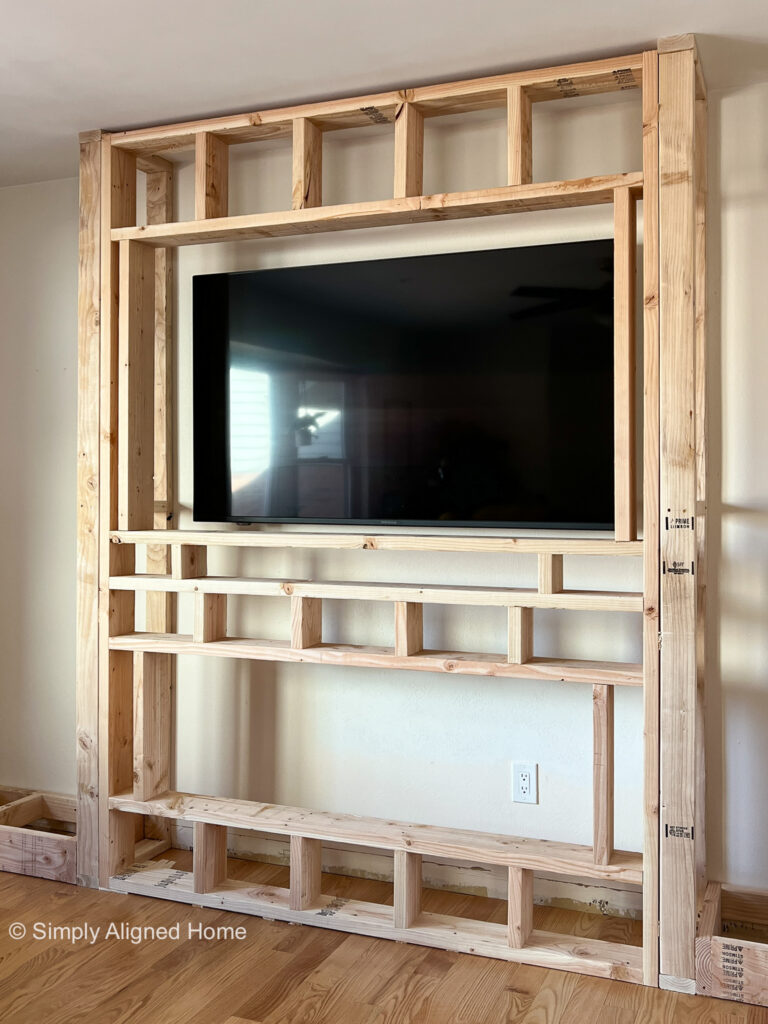
I started by making sure that the structure was fairly plumb before I made sure it was level. Using wood shims, I leveled the fireplace framing. I then secured it in place by screwing through the bottom horizontal piece and into the floor, making sure there was a shim at every location where I secured it.
I then made sure that the structure was plumb and secured it to the vertical bookcase supports in several spots.
I later added a 2×6 piece to go across the top of the bookcase openings. I needed this to be able to install drywall across the top of the bookcases.
Before I moved on to the next step, I made sure that my electric fireplace fit in the opening that I made.
Television Wall Mount
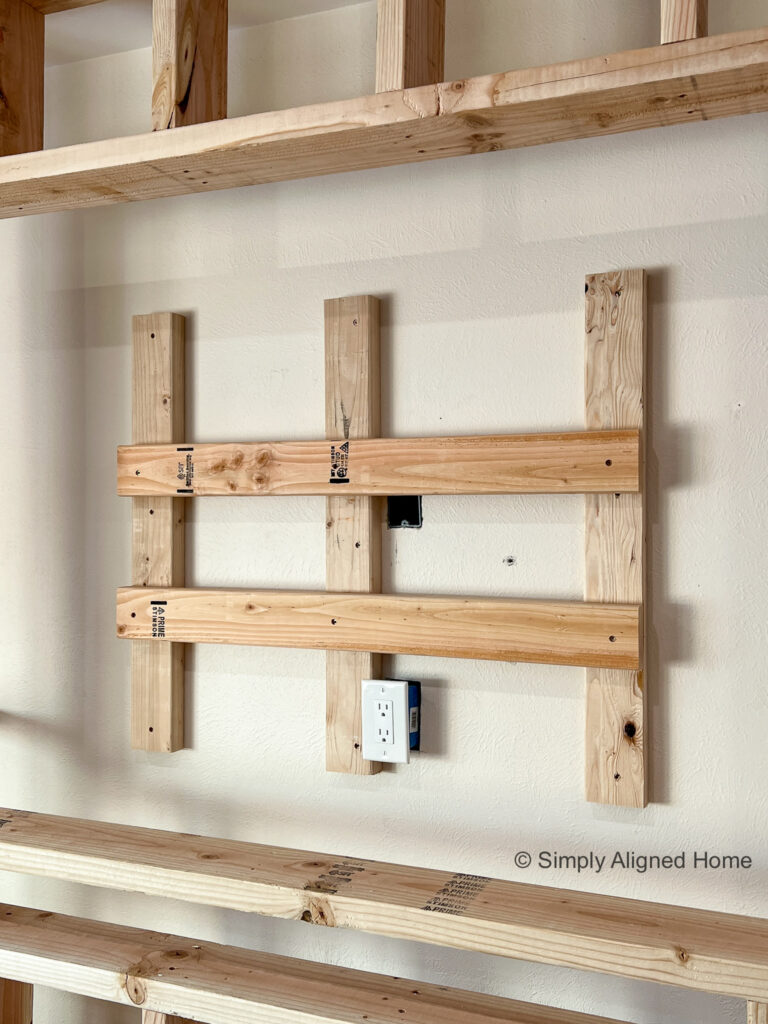
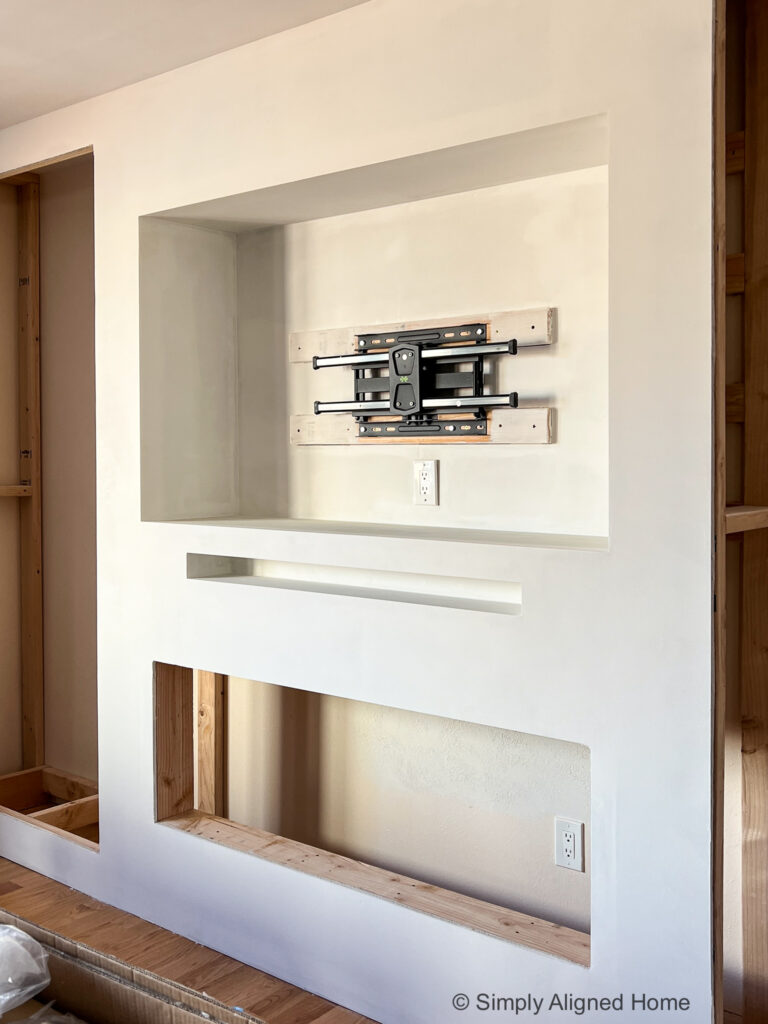
One of the things that I stressed about the most with the framing was the TV mount. I wanted the television to be perfectly centered in the cutout that I made for it. Placement for the mount will be different for every television and mount, so I will save you the details.
The main thing that I did want to do is set the television mount out a little from the wall. In order to do this, I screwed three pieces of wood vertically to the studs. I then secured two horizontal boards to the three vertical supports, making sure that the horizontal boards were at the correct height for the TV mount.
Install and Finish Drywall for Electric Fireplace Built-In
Install Drywall
Even though this is not a traditional fireplace (it is more of a space heater), I used fire rated drywall. The first piece of drywall that I installed was the back piece of the soundbar slot. I secured it to the back side of the framing.
Call me crazy, but I like even the hidden parts to look good. I could have easily skipped drywall on the back of the TV opening, but wanted to hide part of the TV mount supports.
Before I fully drywalled the TV opening, I add a piece of 3/4″ plywood to the base of the opening. I wanted to have a more solid surface to be able to place a power strip and any other electronics on. I then finished installing drywall on the interior of the TV opening.
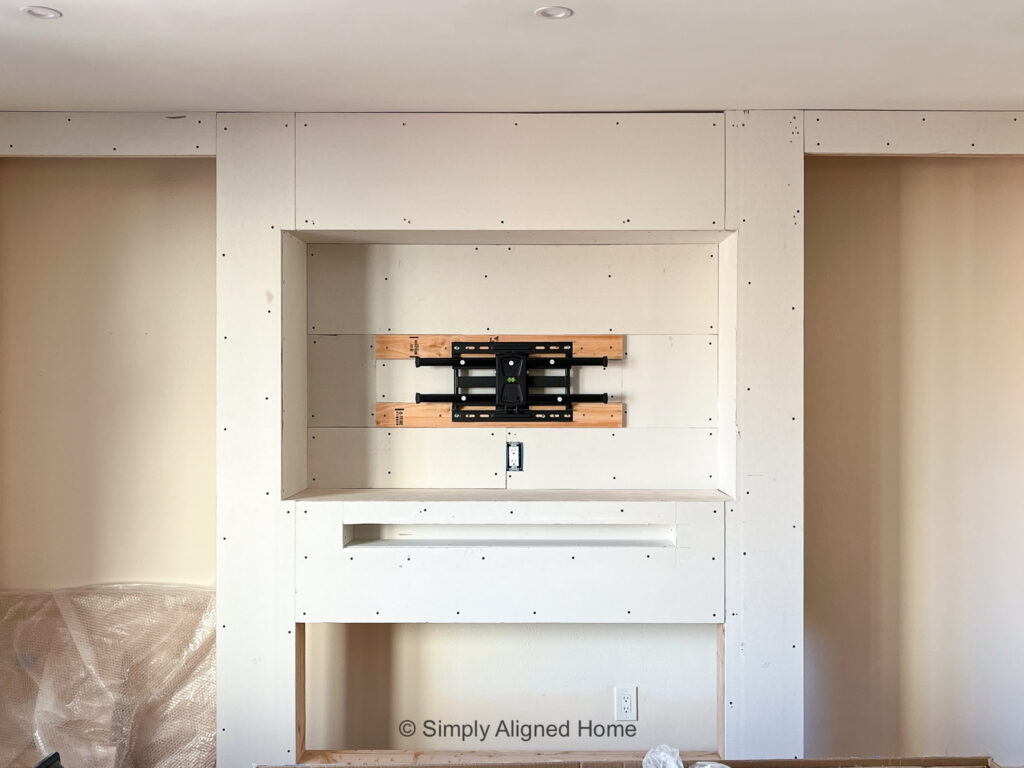
Once the TV opening was done, I installed drywall on the front face of the entire built-in. I made sure to cover all parts of the framing, including above and below the bookcases.
Mud and Tape Drywall Seams
In order to hide the seams, I used two different types of drywall tape. I used mesh tape for any seams on the front face of the built-in. I am no drywall expert, so I won’t go into too many details on how to finish drywall.
For any corner seams, I used a corner drywall tape. I applied the drywall mud, put the tape over the mud and them added another layer of mud. I smoothed it all out with a drywall knife.
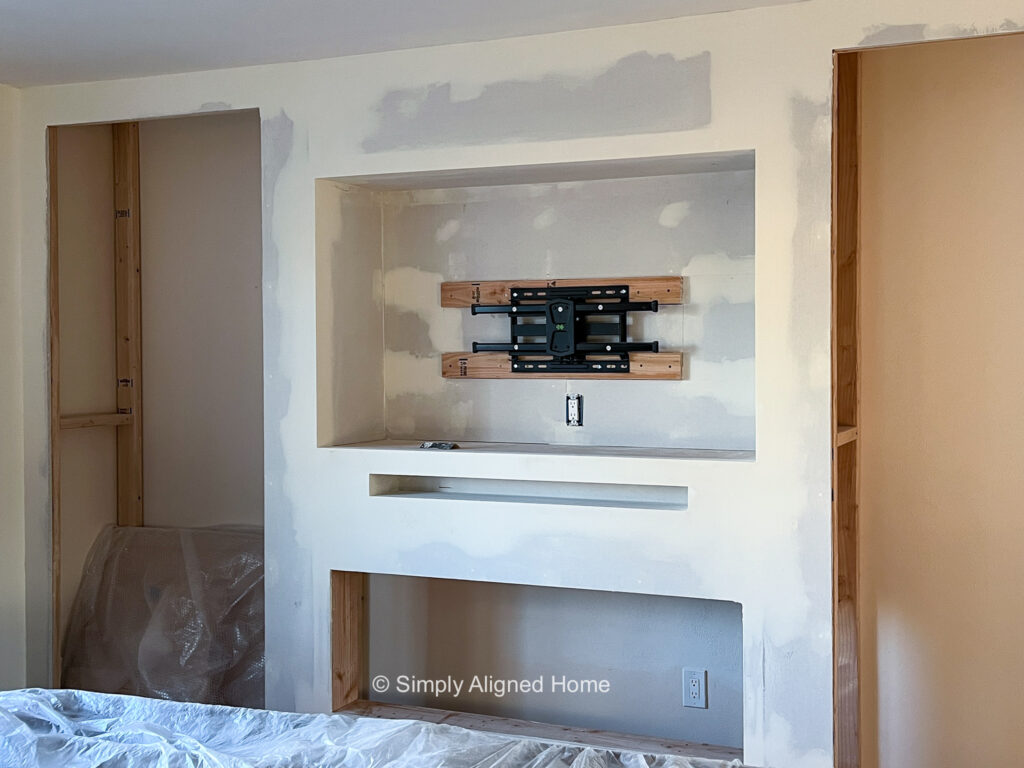
I applied three coats of drywall mud to fully cover the seams and tape.
Sand Drywall Mud
Before I touched a sanding pad, I made sure that everything in close proximity to the built-in was covered with plastic. Sanding drywall makes a huge mess! I like to hand sand so that I don’t make an even bigger mess with a powered sander. I think that next time I sand drywall, I’m going to try wet sanding. I’ve heard it makes less of a mess.
After the drywall mud dried, I lightly sanded it. I made sure that all of the seams were smooth and that the transitions between the mud and drywall were not obvious.
I cleaned up all of the sanding dust before I installed anything. I used a damp cloth to wipe down the drywall, vacuumed everything and mopped the floor.
Prime and Paint
Once the mess was cleaned up, I applied primer on all of the drywall surfaces.
If I’m being totally honest with you, I waited to paint until the very end…which probably wasn’t the best decision. It would have been much easier to paint everything before I installed the TV and fireplace. Now, I have to remove all of it before I can paint.
Install Television and Electric Fireplace in Built-In
Television and Sound Bar
This was the fun part where I saw my design really come together! I drilled a hole in the back of the soundbar opening and the bottom of the TV opening to run the soundbar cords. I installed a conduit to house the cords.
I put the television on the mount and plugged everything in. The television mount that I purchased was perfect…it allowed me to adjust the television in just about every direction. I was able to perfectly center the TV in the built-in opening.
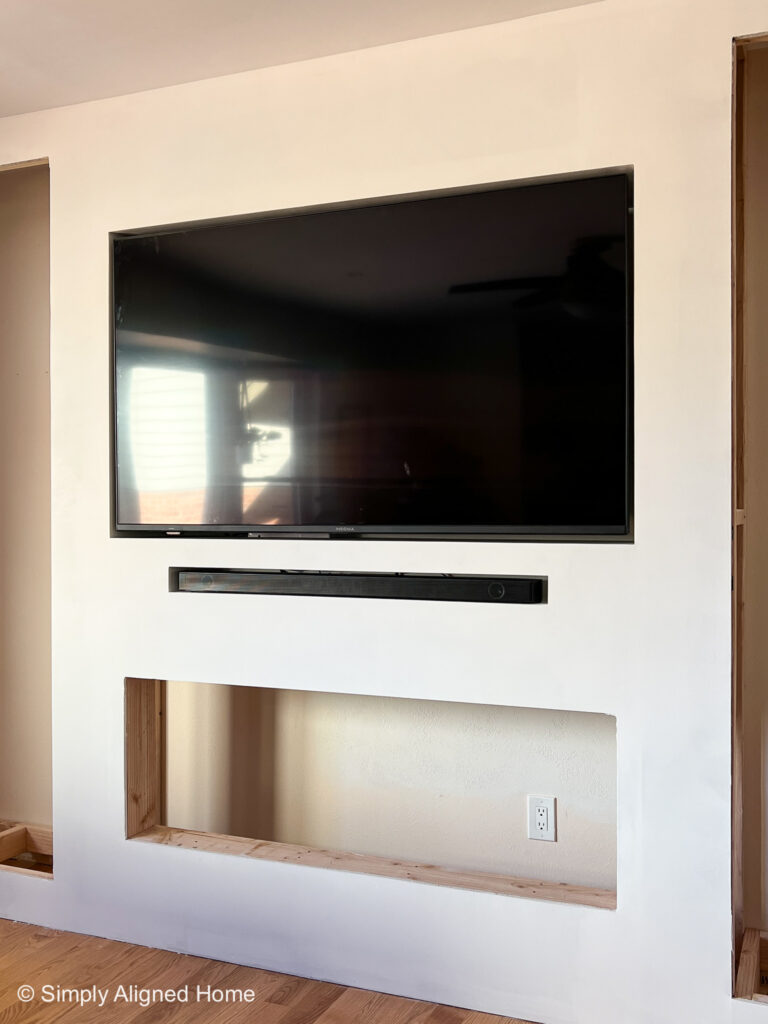
Another question that I’ve received is how I access the back of the TV. The mount that I purchased allows the TV to extend slightly beyond the drywall. I can also twist the television. With those to features, I am able to easily access the back of the TV and the wall behind it.
Electric Fireplace
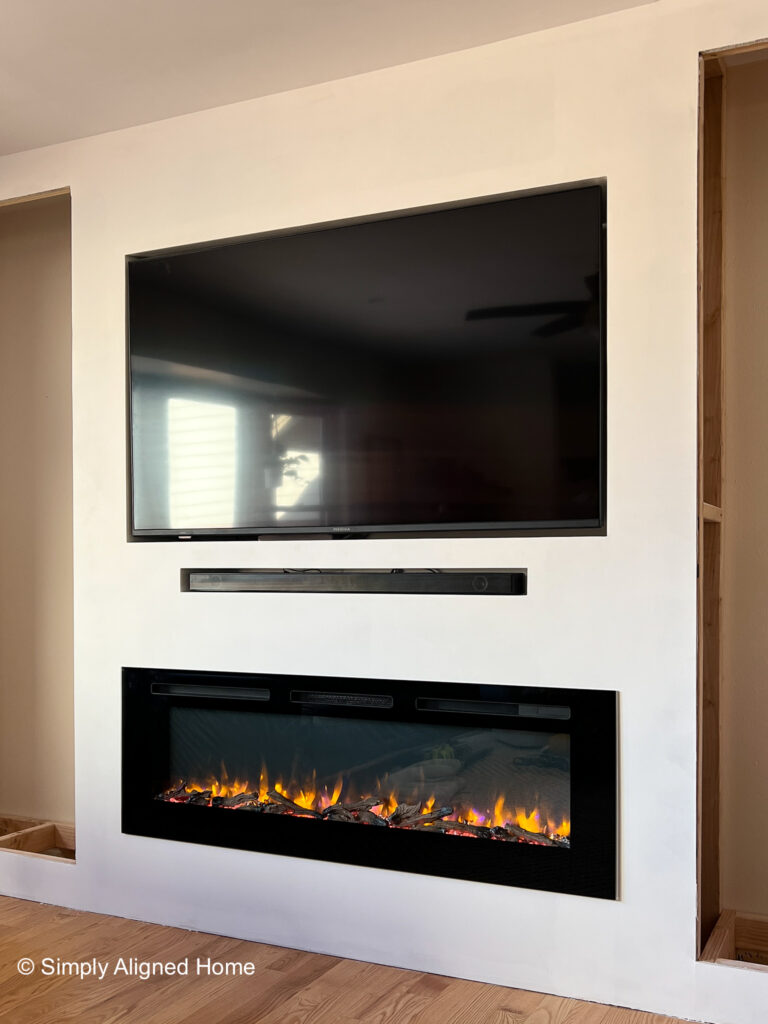
Installing the electric fireplace was surprisingly easy! I placed it in the opening and secured it to the framing with the four screws that were provided with the fireplace.
I then added the fake logs and crystals. Electric fireplaces don’t have real flames…the flames are just reflections of light that look like real flames. With my fireplace, there is a light that projects from beneath the fake logs and lights the crystals to make it look like embers. It’s actually really neat!
The final piece of the fireplace was adding the glass. I has two hook that secure it to the frame of the fireplace and two set screws. That’s it! It really was super easy to install!!
This was the first step for my electric fireplace built-in. The next step was building and installing the bookcases. Once those were installed, there were just a few finishing touches before the built-in was complete! Doesn’t it look amazing?!

**Note: I am not a professional and do not claim to be an expert. Please be sure to always read instructions for all tools and products. Safety is very important and should be your top priority. Wear necessary protection when using tools (eye wear, hearing protection, gloves, etc.) and dust masks when sanding or cutting. Simply Aligned Home is not responsible for any injury or damage. All of my designs are not professionally designed and are for private use only.**
Tools Used
- Miter Saw and Miter Saw Stand
- Impact Driver and Drill
- Magnetic Stud Finder
- Quick Clamps
- Level
- Hand Sander and Sandpaper
- Paint Brush
- Paint Roller
Materials Used
- 2×4 Studs
- 2×6 Studs
- 3-1/2″ Construction Screws
- Wood Shims
- Firerated Drywall
- Drywall Screws
- Drywall Mud
- Mesh Drywall Tape
- Corner Drywall Tape
- 3/4″ Plywood
- Primer
- Paint