
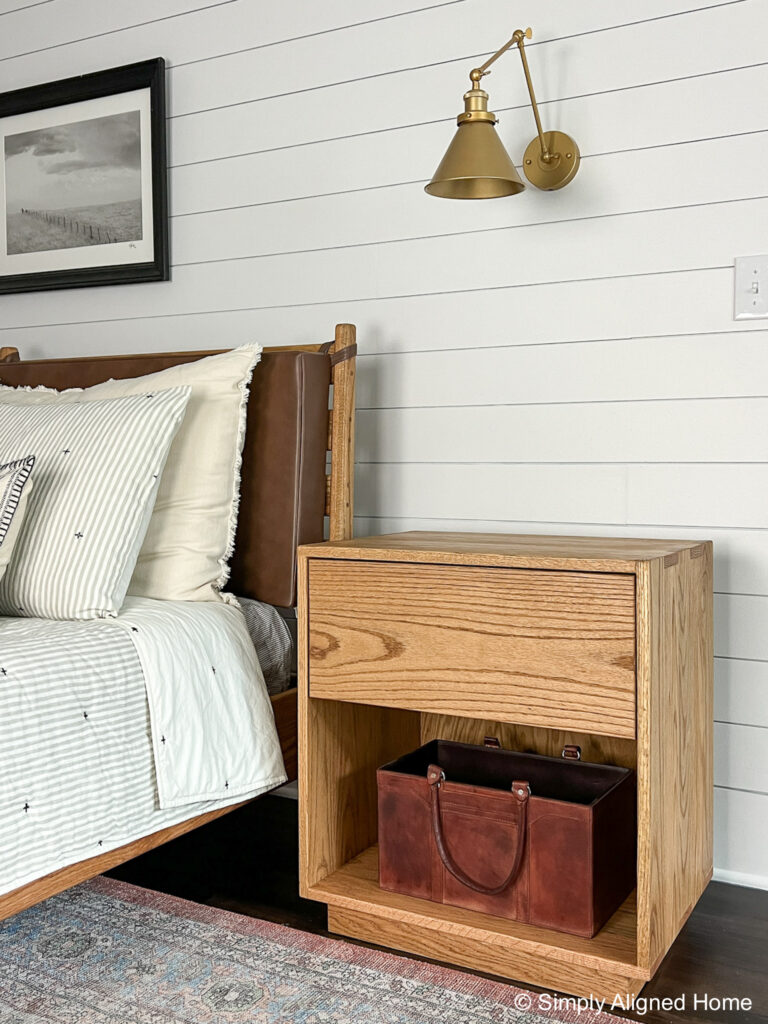
My favorite part of building my own furniture is being able to take a design that I love and turn it into a piece of furniture that works for my home! I found a modern entryway table that I absolutely loved, but I don’t need a new entryway table. Instead, I used the design to make nightstands!! This tutorial will help you build a modern nightstand of your own.
**This post contains affiliate links to products that I used or recommend. If you purchase something through an affiliate link, I may receive a small percentage of the sale at no extra cost to you. I really appreciate your support.**
Select and Purchase Wood
When I first started building furniture, I only purchased pine wood. It is much cheaper and a little easier to work with than most hardwoods. That way, I didn’t feel bad if I made mistakes or the piece of furniture didn’t turn out exactly as I hoped. If you are a beginner, I would recommend working with cheaper woods for your first few projects.
For my nightstands, I wanted them to match the bed that I recently made. I made the bed out of a red oak wood, so I did the same for the nightstands. I really like oak wood and red oak is usually available at big box stores.
Below is the list of wood that I purchased for one nightstand:
- 6 – 1″ x 3″ x 8′ Long Oak (Nightstand Box)
- 1 – 1″ x 12″ x 2′ Long Oak (Drawer Face)
- 1 – 1/4″ x 2′ x 4′ Oak Plywood (Nightstand Back)
- 1 – 3/4″ x 2′ x 4′ Plywood (Drawer Box)
- 1 – 1/4″ x 2′ x 4′ Plywood (Drawer Box Bottom)
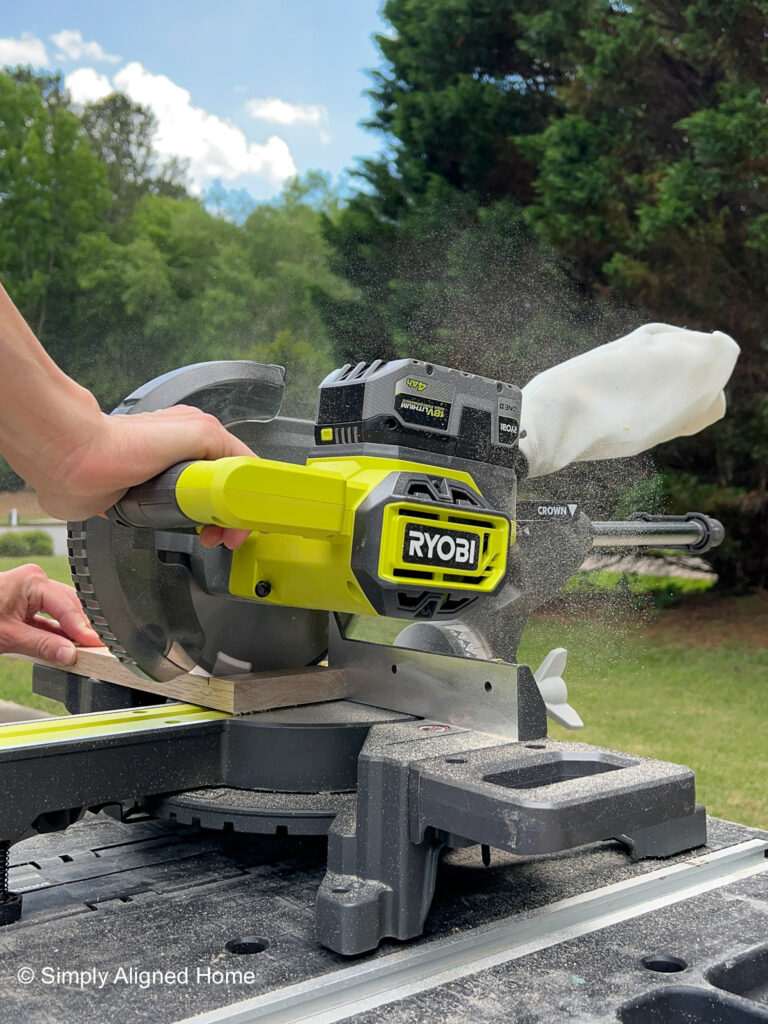
Cut Wood to Length
I purchased 8′ lengths of wood for the nightstands. I needed five pieces of wood per side panel for the nightstand. In order to have minimal waste, I cut the pieces to 23-3/4″ long using my miter saw. I cut a total of twenty (20) pieces.
Prep for Glue Up of Four Panels
Now for the fun part! Panel glue ups are actually really fun it you are prepared. The best way to prepare is to have everything laid out and ready to go before you apply any glue.
I started by setting my pipe clamps to slightly wider than the finished width of two panels. I thought it would be a good idea to clamp up two panels at once, but it would probably be easier to clamp up one panel at a time.
In order to not discolor the wood, I put painters tape on the top of the pipe clamps. I also taped the pieces of wood that I was going to use as cauls for the clamp up.
I like to lay out my entire glue up before I apply any glue. It’s nice to be sure that I have all of my clamps in the correct place. This also gives me a change to make any adjustments to my clamps before I start the glue up.
Glue Up Four Panels
Once everything was ready and in place, I applied wood glue to the edges of the wood. I used a glue brush to ensure that the surfaces were fully covered.
Here is the tricky part…I needed to offset the ends of the boards for the design of my nightstands. I offset the ends 13/16″. This will give me an extra 1/16″ to work with once I assemble the nightstands. It’s always easier to remove material than to add material.
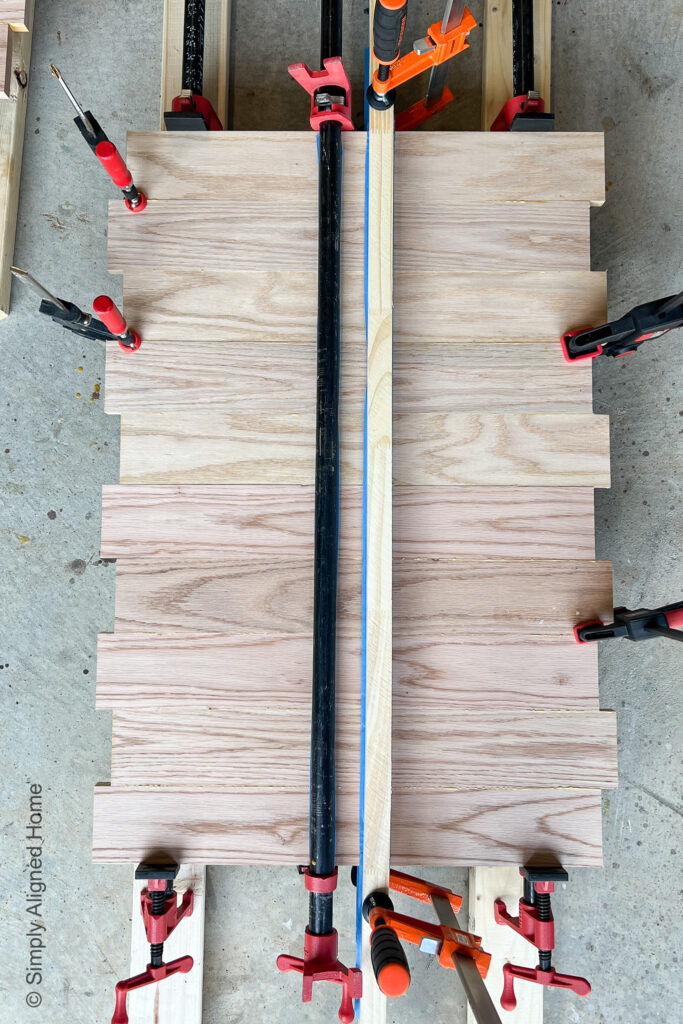
I used several pipe clamps and cauls for the glue up. Cauls are used to keep the boards flat and aligned when clamping. Once everything was clamped, I allowed the glue to set for 24 hours before removing the panels from the clamps.
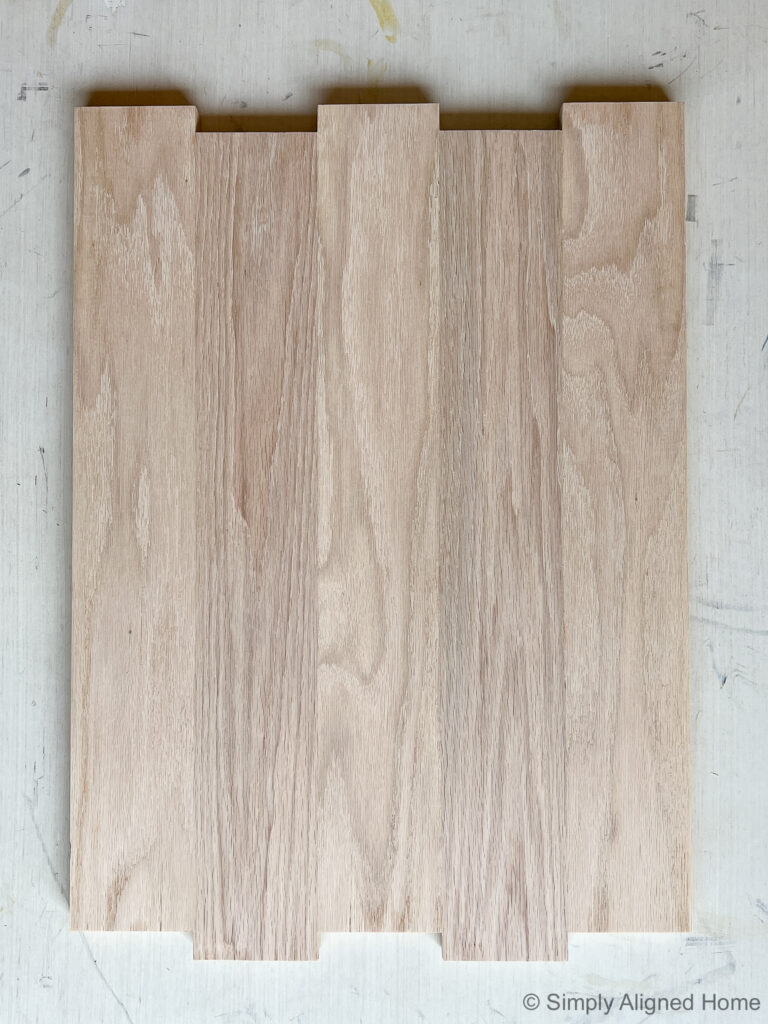
Plane and Sand the Panels
It’s always easiest to smooth out the panels before assembling the box. Unfortunately, I do not have a tabletop planer, so I had to use a hand planer. You can also use a powered hand planer for this…just be sure you don’t gouge the wood. I just lightly went over the seams on both sides of the panels to remove any high spots.
Once I was happy with the seams, I sanded each side of the panels with my orbital sander. I started with 120 grit and ended with 220 grit.
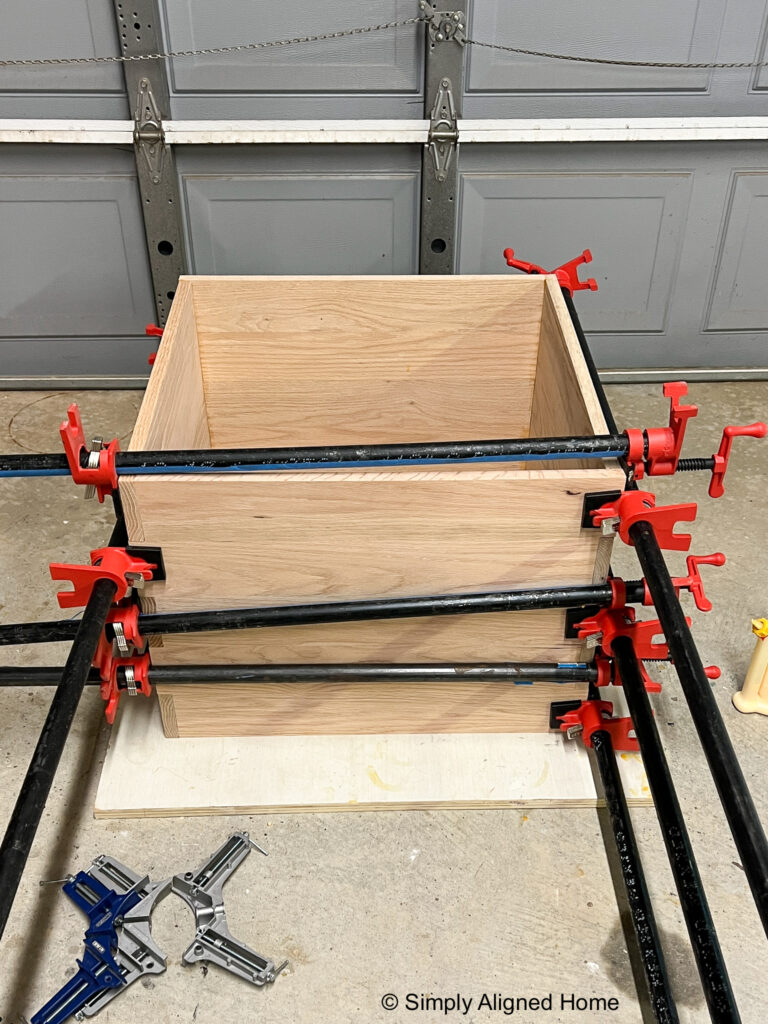
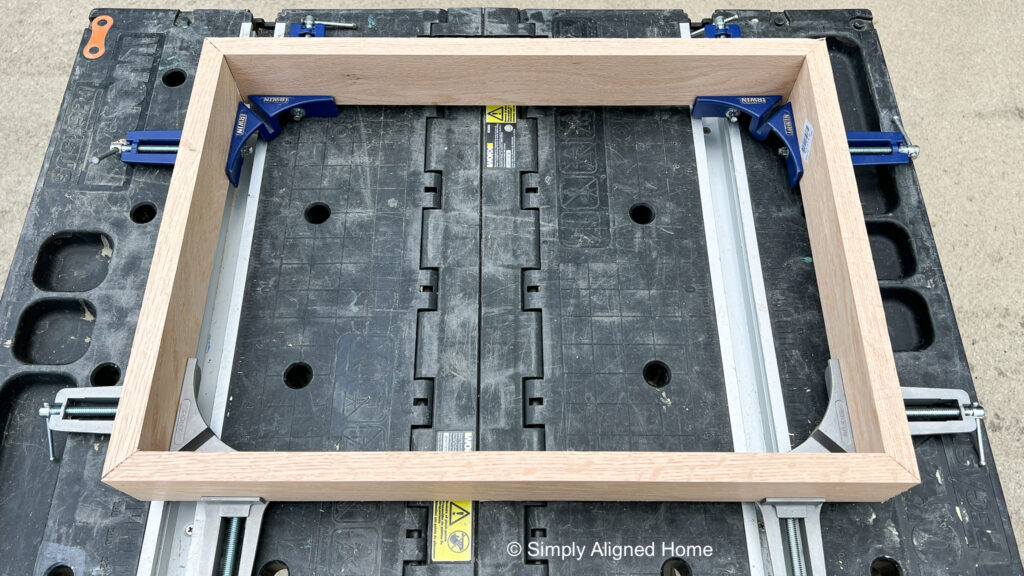
Assemble the Nightstand Box
This part was a little challenging at first, but once I came up with a plan, it was much easier!
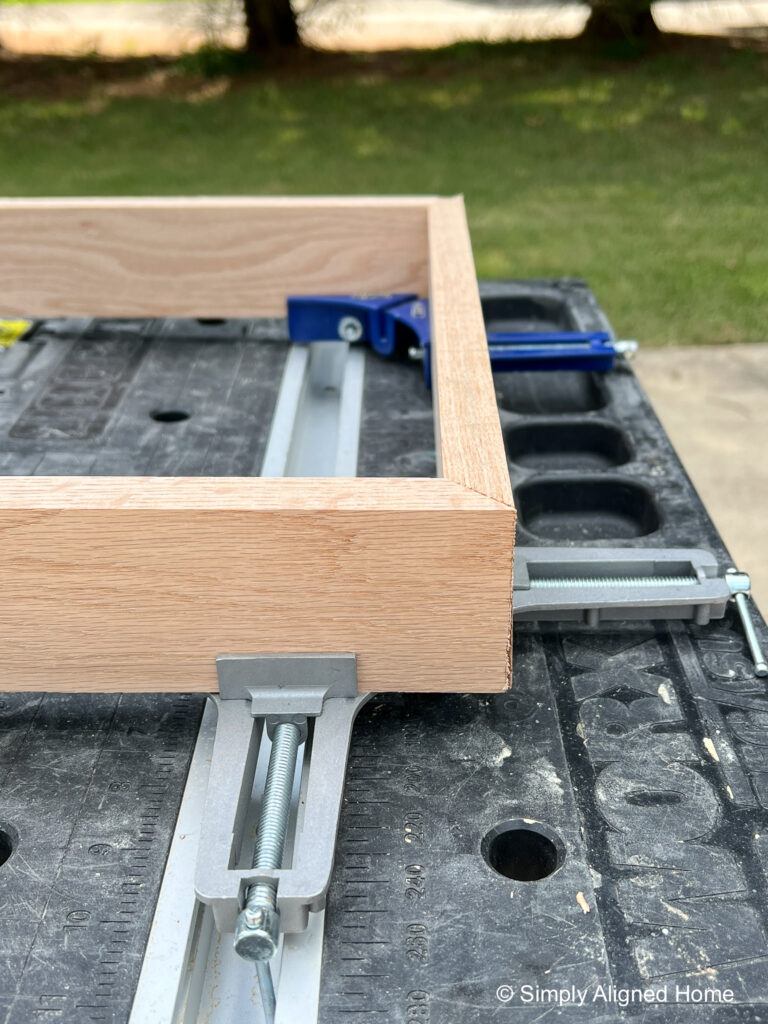
I started by putting two of the panels together. I aligned them using corner clamps…this ensured that they remained square. I then used pipe clamps to hold the panels together while the glue had time to dry.
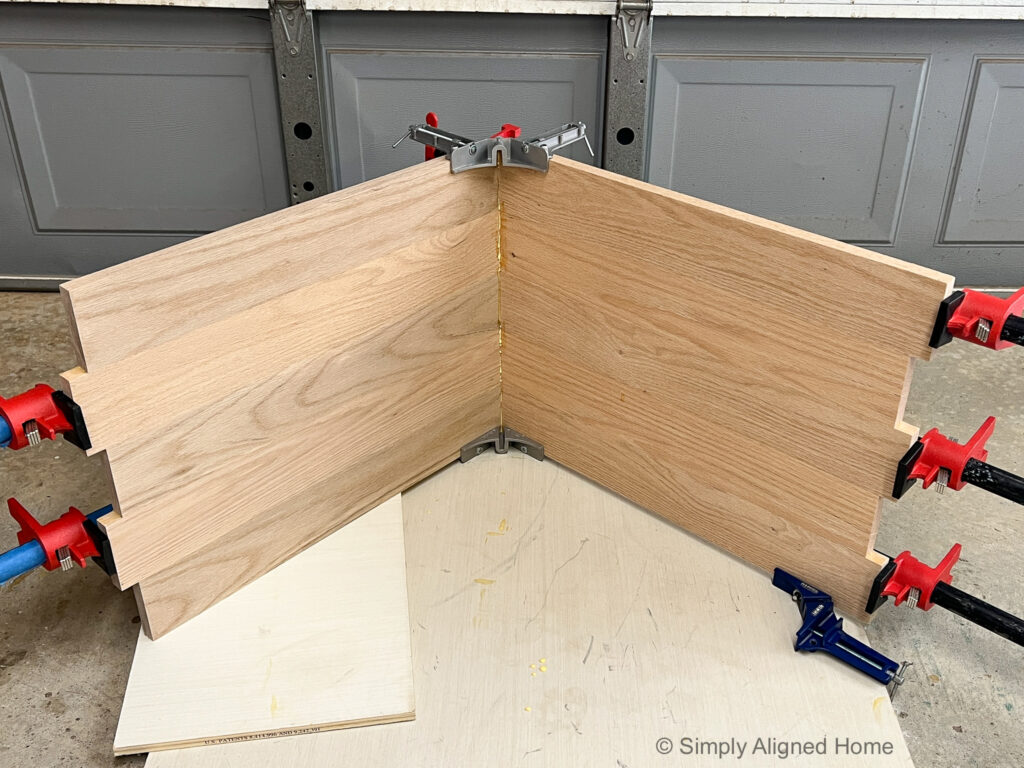
With the first box that I made, I tried to glue multiple corners at one time. Not only did I not have enough clamps to do this, it was really difficult to keep everything square this way. Therefore, I glued one corner at a time and allowed the glue time to dry before gluing the next corner.
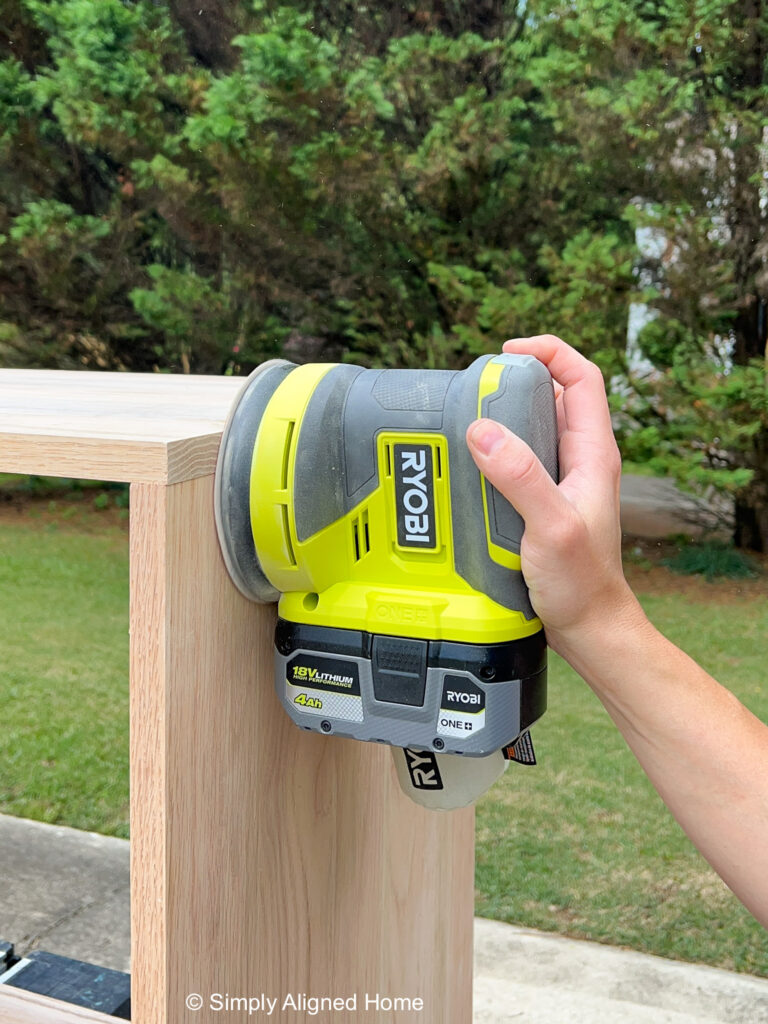
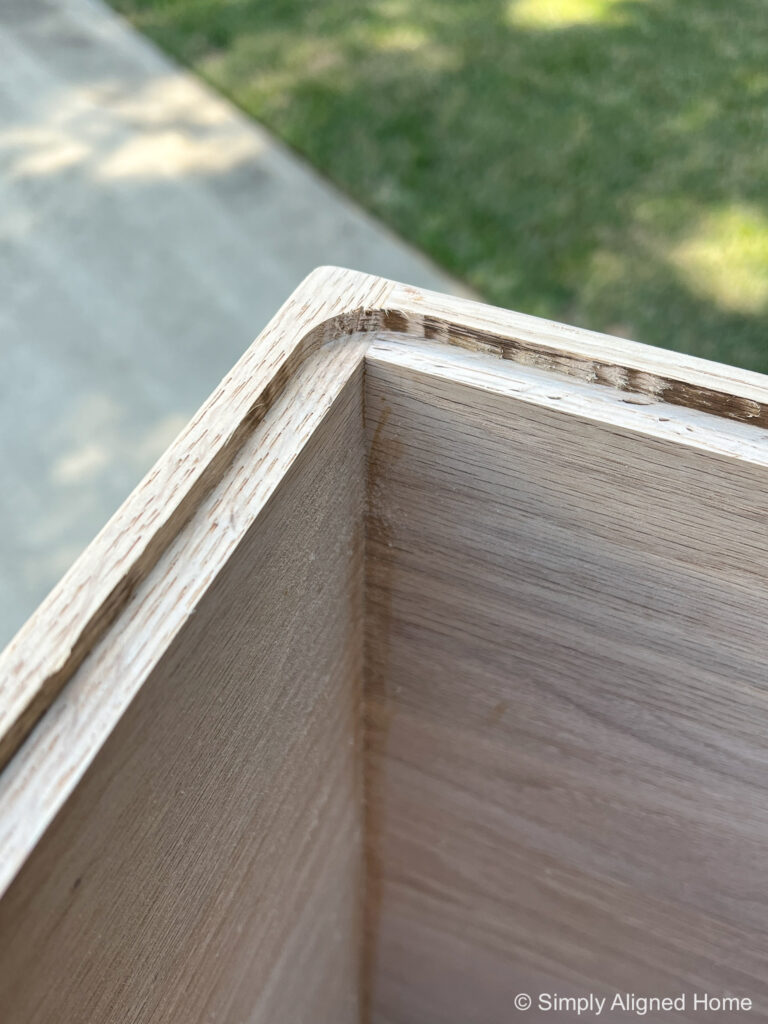
Sand and Route the Edges
Since I allowed for a 1/16″ overhang on each panel, I now needed to sand them flush. This was a little time consuming, but the finished product will look so much better than if the ends would have been too short. It’s always easier to remove material than add it!
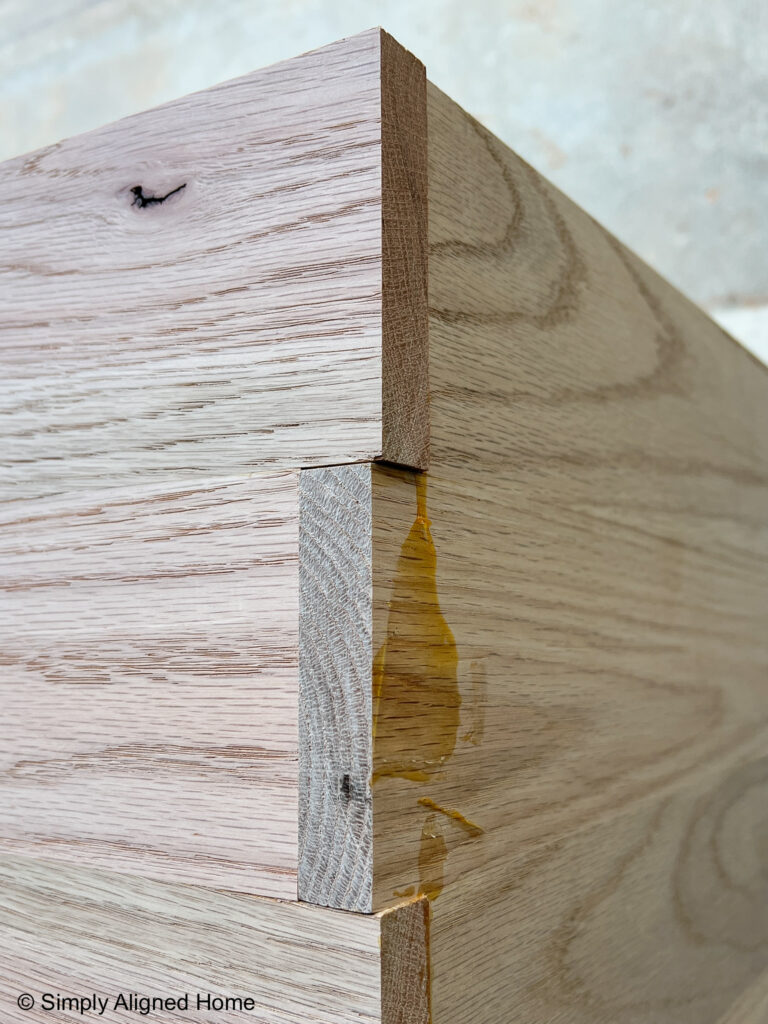
Using my orbital sander, I started with 80 grit sandpaper and slowly worked my way to 220 grit sandpaper. I was careful to only sand the overhangs, trying to not make any low spots in the ends.
After the ends were sanded flush, I decided to route the edges of the nightstand box. I used a small round over bit and did the inside and outside of the edges. You can also round the edges by hand sanding or gently using a palm sander.
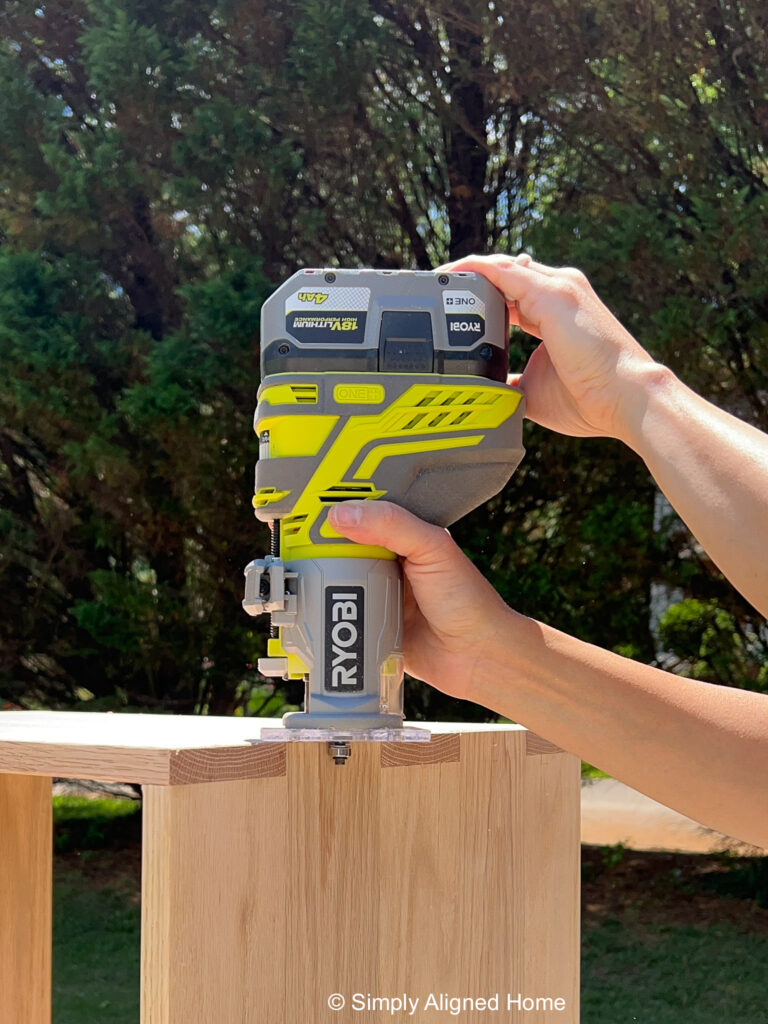
Rounding the edges of the box gives it a much more professional finish.
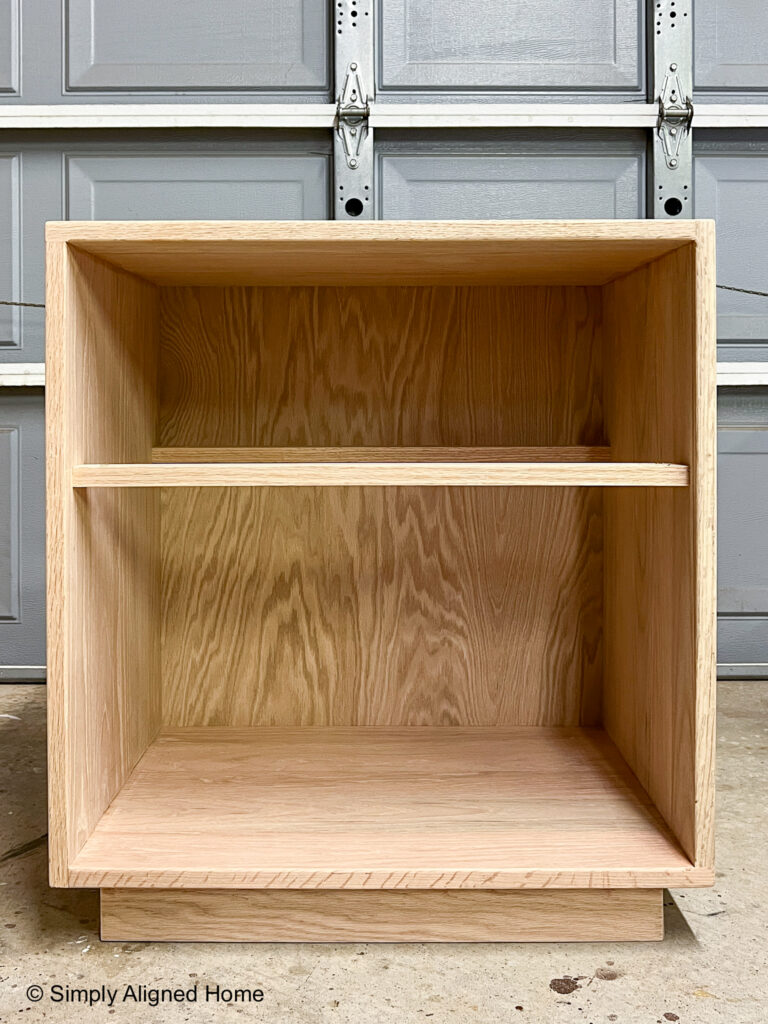
Make and Install Nightstand Base
In order to add a little height to the nightstand, I made a little base. I made the base out of 1×3 oak. The base is about 2“ smaller the frame of the nightstand all around.
I started by cutting the four sides of the base. I mitered the corners for a really clean look.
Using my corner clamps, I glued and nailed the base together. Once the glue had time to dry, I filled the nail hole with wood filler and sanded the base.
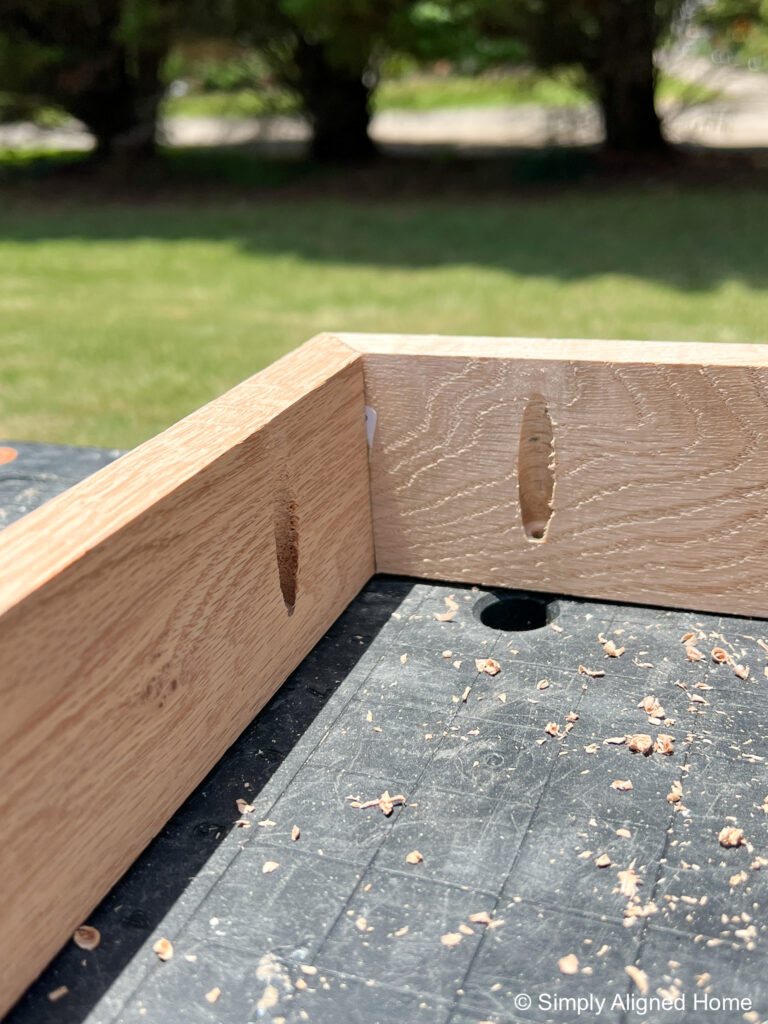
I planned on attaching the base to the nightstand frame using pocket screws. The holes for the pocket screws would be hidden. I made two pocket holes per side using my pocket hole jig.
On the underside of the nightstand, I marked where the base needed to go. I then applied wood glue to the base and screwed it to the nightstand frame.
Install Nightstand Box Cross Members
In order to add to the rigidity of the box, and also keep things square, I added two cross members to the nightstand box. I secured the cross members to the box using pocket screws. I made sure that the pocket holes were facing up. This way, they would not be visible once the drawer box was installed.
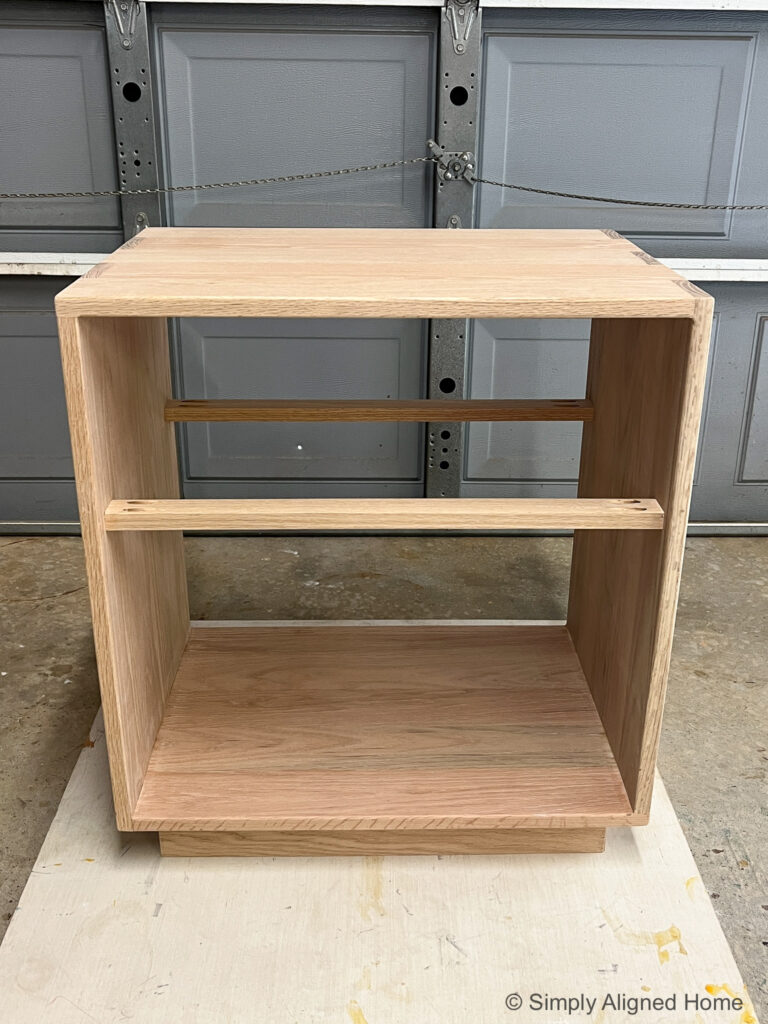
The cross members don’t just add to the rigidity, they also help with the installation of the drawer box. I also like to the use the front cross member as a stop for the drawer.
Install Nightstand Back Panel
I have made a few nightstands. The easiest and quickest way to add a back panel is to simply cut a piece of 1/4” plywood to size and attach it to the back of the nightstand frame. The downside of doing it this way is that you can see the back panel from the side of the nightstand.
To achieve a more profession and finished look, I routed out the back of the nightstand box to be able to inset the back panel. This router bit set has a nice variety of bits.
Using 1/4” oak, I cut the back panel to be able to fit within the routed space. I attached the back panel to the frame using brad nails.
Make and Install Drawer Box
Drawer boxes can be made several different ways. Since the drawer box isn’t visible with the drawer closed, I am all about making the drawer quick and easy! I will share how I make my drawer boxes in a detailed blog post. I have also found an easy way to install the drawer box…I will share that in a blog post too.
The size of the drawer box will be based on the drawer slides selected. Be sure to read the instructions for the drawer slides prior to building the drawer box.

Stain and Seal Nightstand
I finished the nightstand using Watco Danish Oil in Medium Walnut. This is a product that stains and seals in one step. I did two coats of the Danish Oil on all surfaces of the nightstand box.
I don’t bother staining the drawer since it won’t be seen. Instead, I simply sealed it using a water based poly. I applied two coats of poly with a light sanding between coats.
Make the Drawer Face
The final piece of the nightstand build is the drawer face! With the nightstand box assembled and the drawer box installed, I was able to measure for the drawer face. I like to make my drawer faces about 1/16″ smaller than the opening.
I cut the drawer face out of 1 x 12 oak. I routed the edges of the drawer face using a small round over bit. I also routed the inside bottom of the drawer face using a chamfer bit to give me a nice place to open the drawer. Once I was done with the router, I sanded the drawer face.
I then stained and sealed the drawer face using Watco Danish Oil in Medium Walnut.
Install Drawer Face
It can be really difficult to perfectly align the drawer face. One thing that I love to use to make it easier is double sided tape! I applied a few pieces of tape to the drawer box. With the drawer box shut, I put the drawer face in place.
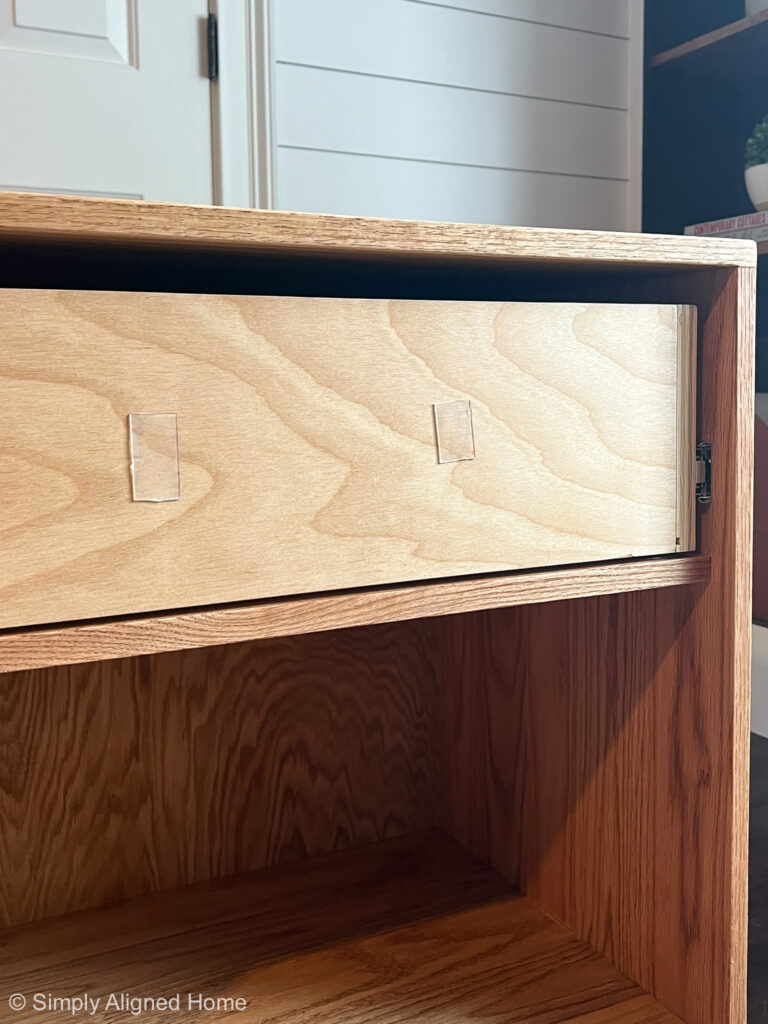
I then opened the drawer box and drilled pilot holes through the drawer box and into the drawer face. I removed the double sided tape before I screwed the drawer face to the drawer box.
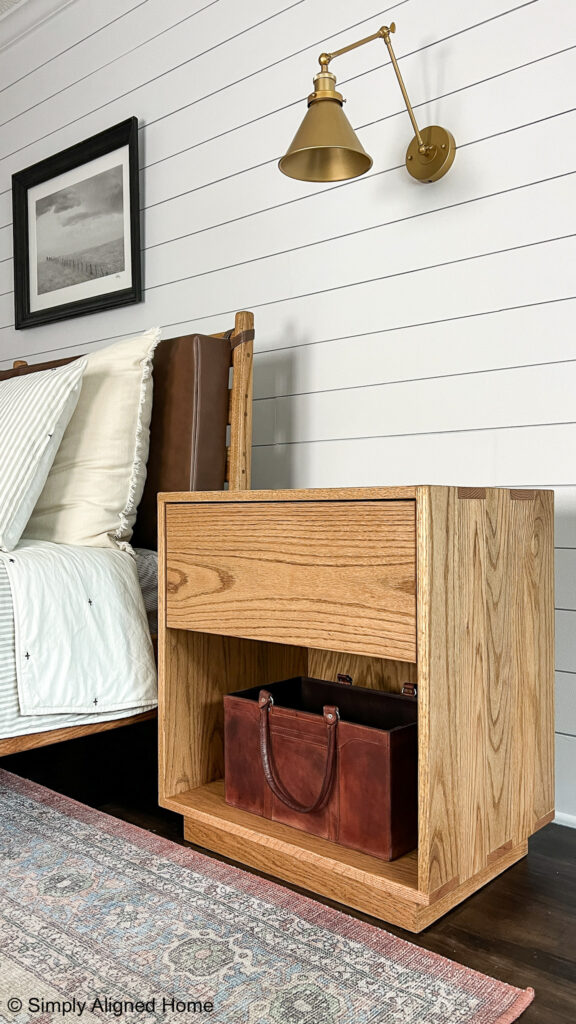
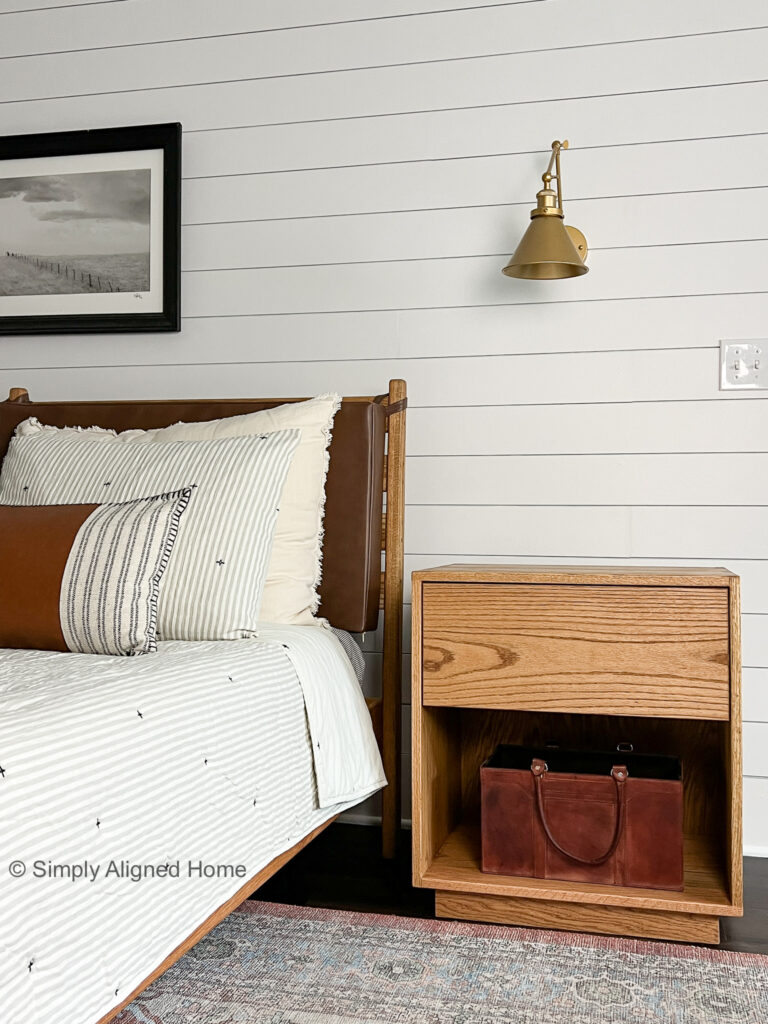
The finished nightstand is exactly what I needed to finish off our room! It matches our bed perfectly and I just love the clean, modern design!!

Did you make your bed? Including the leather cushions? I just discovered your blog and have LOVED every project you have done. I plan to try several of them including the mortar bowls for CHRISTmas gifts this year.
Thank you so much!! I did make the bed and cushions. I cut the cushions out of foam and had my mom make the covers.