
This post is sponsored by Cricut, but all views and opinions shared in this post are my own.
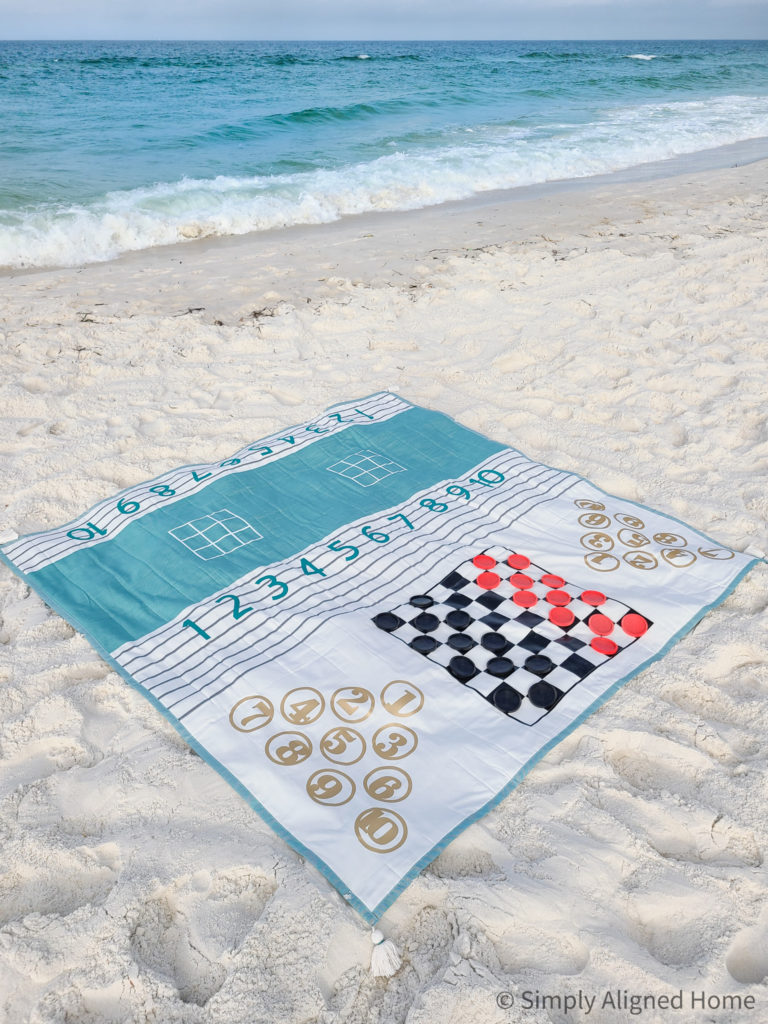
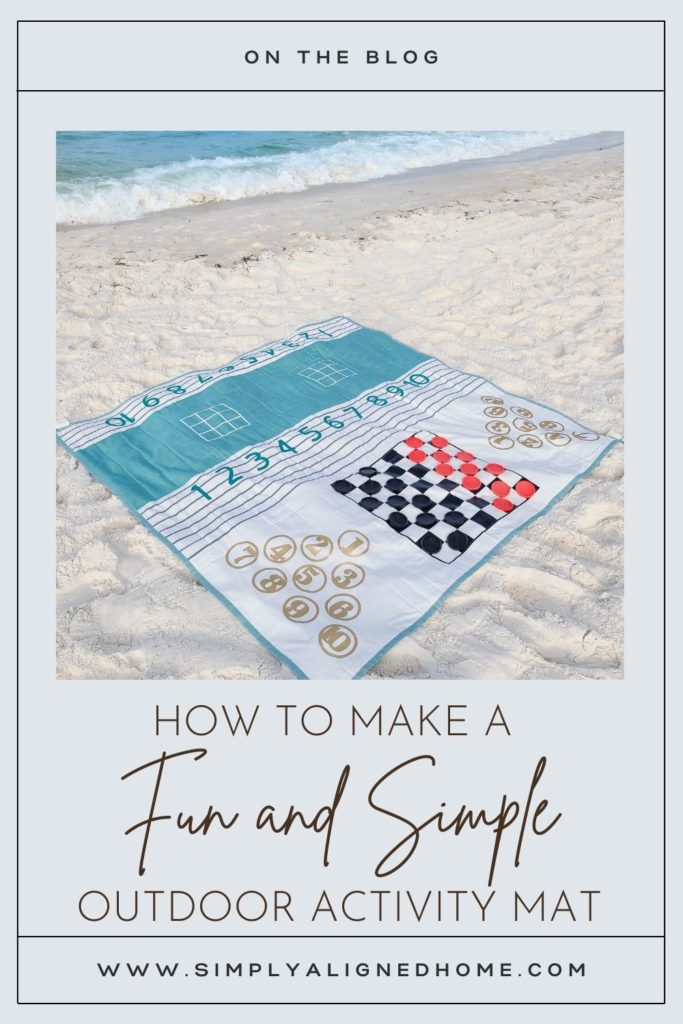
It never fails…we take plenty of toys to the beach or park, but the kids are bored in no time! We recently had a beach trip and I refused to add even more toys to our beach bag. Instead, I decided to turn an outdoor blanket into a fun activity mat that would keep everyone one entertained (even my husband). It was not only really easy to make, but everyone loved it! In this post, I’ll share how I made the outdoor activity mat as well as the tools and materials you need to make one of your own!
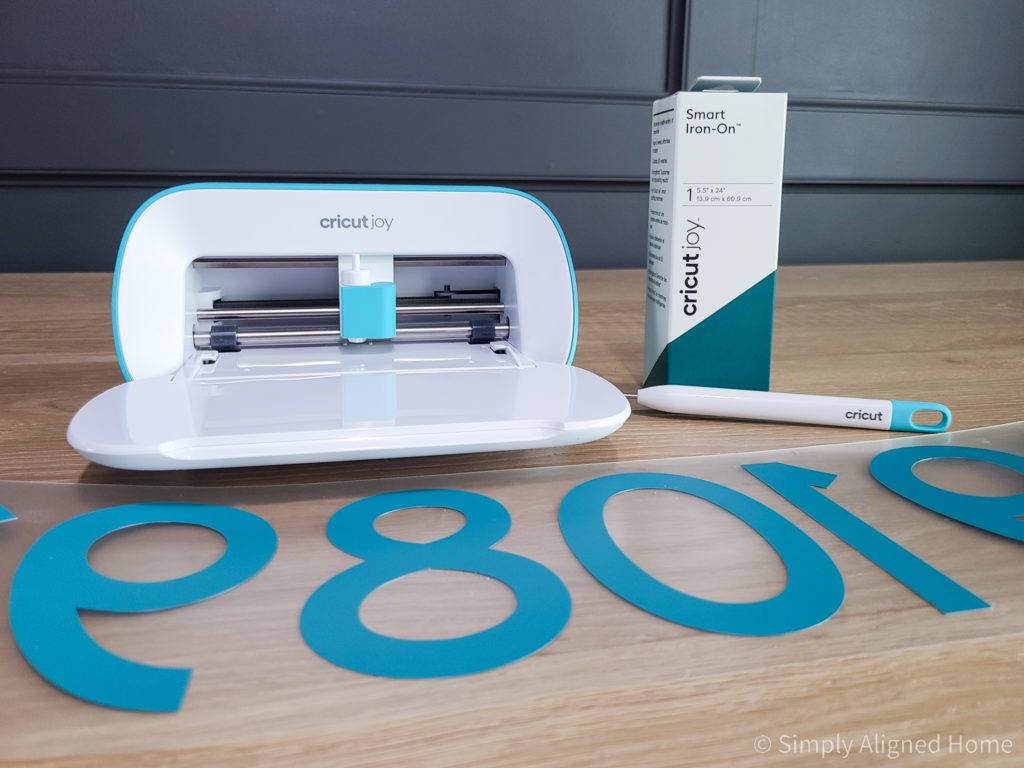
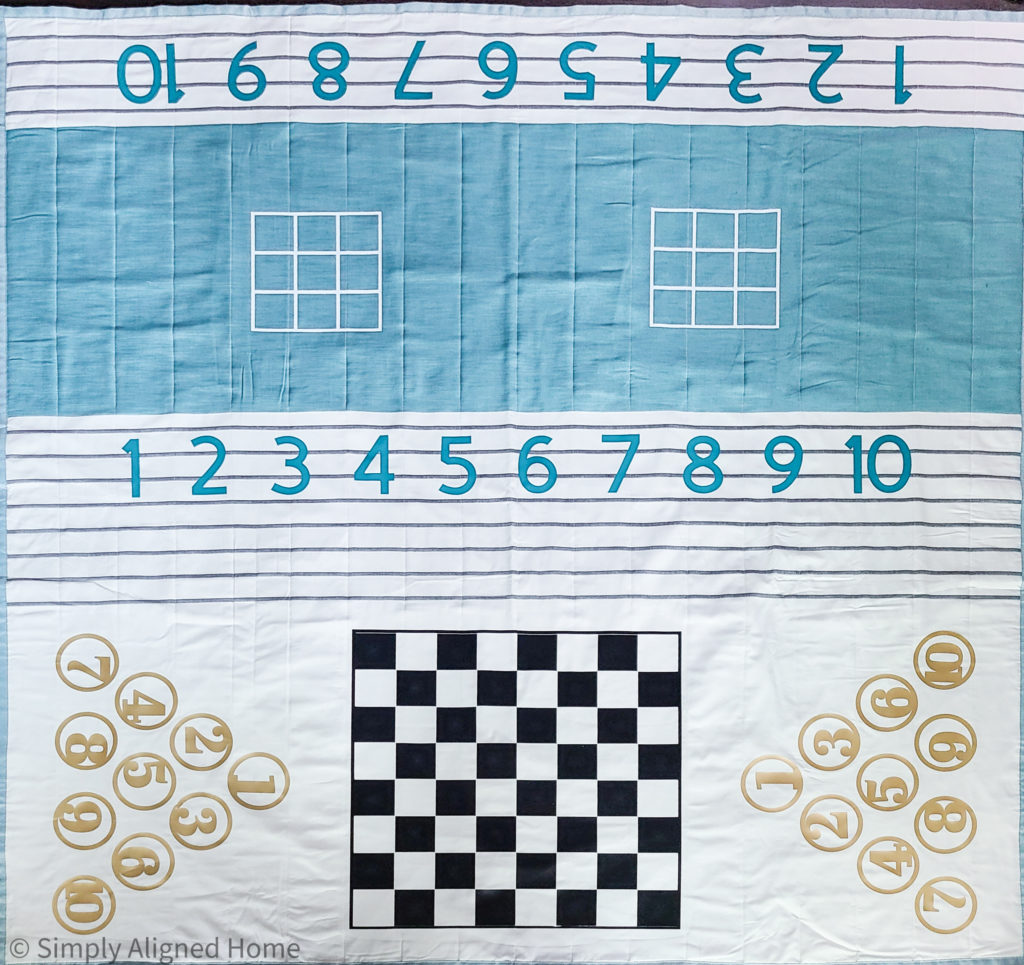
Numbers Using Cricut Joy
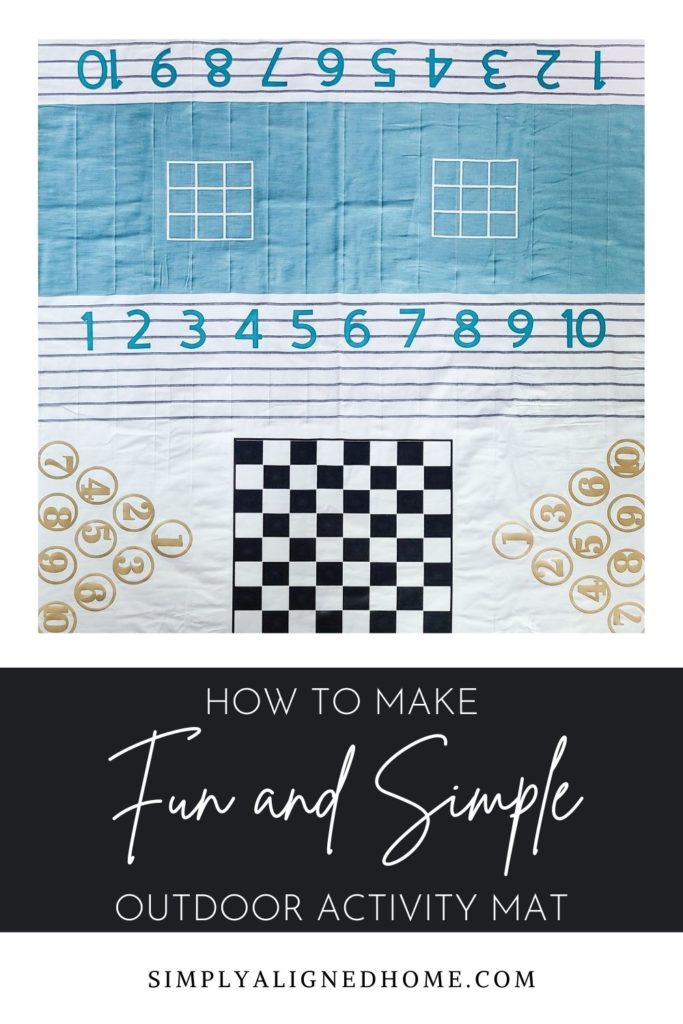
My family is very competitive! Everything is a race and we’re always keeping score. I thought numbers for keeping score would be a great addition to the activity mat!
This was the first time I’ve used the Cricut Joy…I was amazed by how easy it was to use! It is compact, connects via Bluetooth, user friendly and uses the Cricut “Smart” line. You can use your standard vinyl and StandardGrip Mat with the Cricut Joy, or you can use the Smart Iron-On or Smart Vinyl products. The Smart products don’t require the StandardGrip Mat…you just load the roll into the Cricut Joy and it starts cutting! This was a total game changer for me!!
Using my favorite font, Cricut Sans, I printed two sets of numbers using the Cricut Smart Iron-On. I wanted the numbers to be fairly large, so I made them 4.5″ tall.
Since I am using iron-on for the entire project, I made sure to mirror everything before printing. When I iron them onto the mat, they will be the correct orientation.
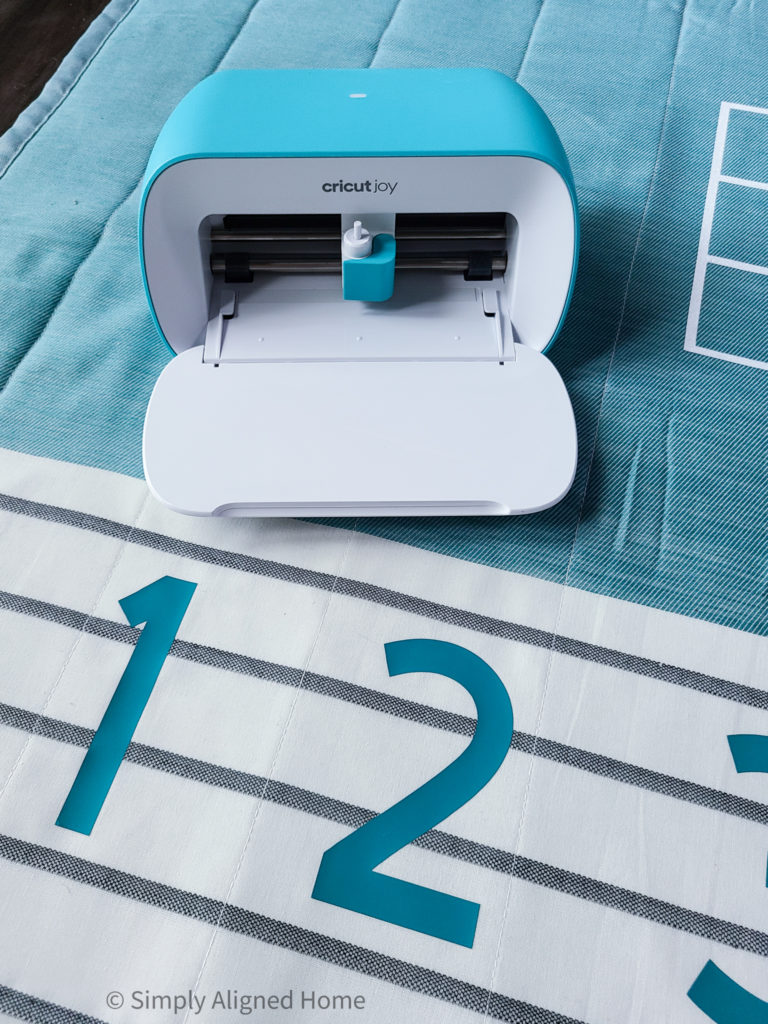
The teal numbers matched my outdoor mat perfectly!!
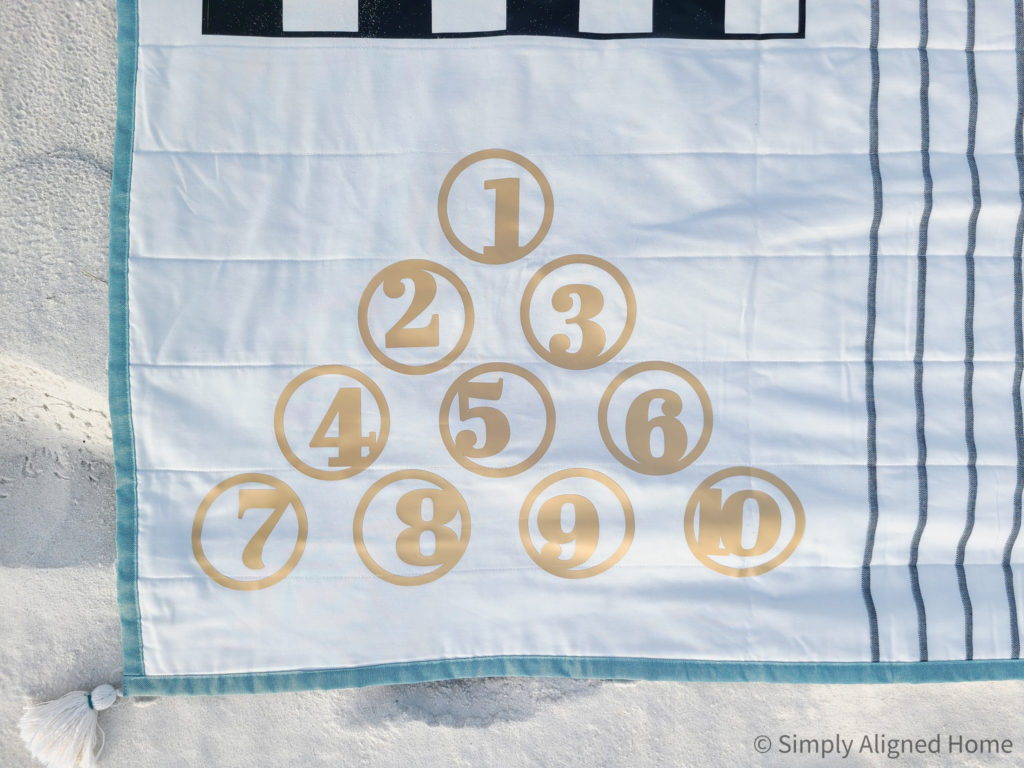
Number Circles Using Cricut Joy
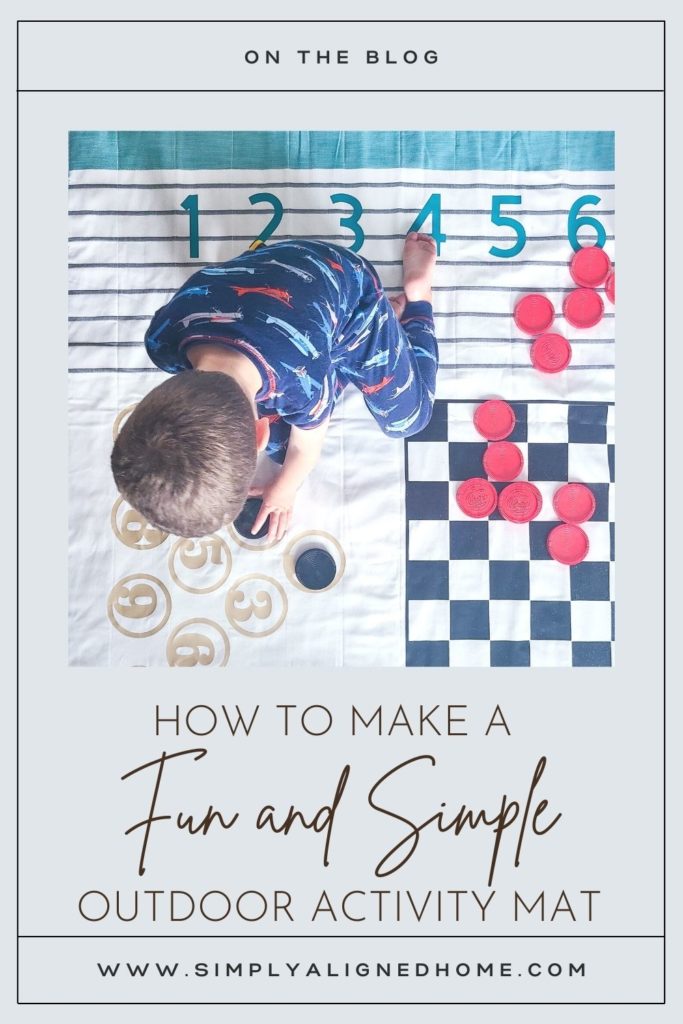
Next up…more numbers! My middle child is really into counting right now. My kids also like to collect things when we’re playing outside, like acorns and seashells. I thought that adding numbers with circles would be a fun way to count the items that they collected!

I found these really fun numbers in circles in the Cricut image gallery and decided to use them. I feel like the majority of the time spent creating with my Cricut is spent on the design. If I can use designs that already exist, I can save so much time!

The Cricut Joy really is so easy to use that I wanted to use it for as many items as I possibly could! I made the circles small enough to print on the Smart Iron-On and decided to use gold. I love how they pop against the white of the blanket!
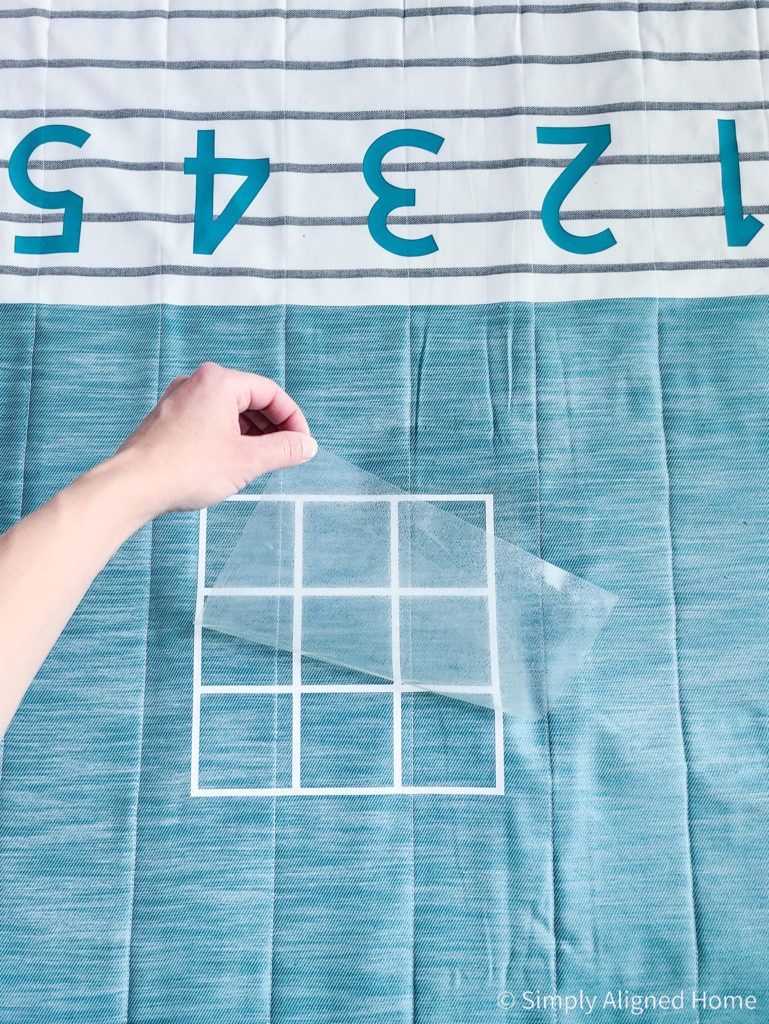
Tic Tac Toe Using Cricut Explore Air
A game that is easy for the whole family to play is Tic Tac Toe. I love that it’s quick and easy to learn and fun to play! I wanted to make the spaces big enough that we could play with any items that we find in the yard or on the beach. Therefore, I switched to my Cricut Explore Air for this one.
If you haven’t noticed a theme yet, I have to create everything in two’s. I did this in hopes that there will be less fighting over who gets to play what on the activity mat.
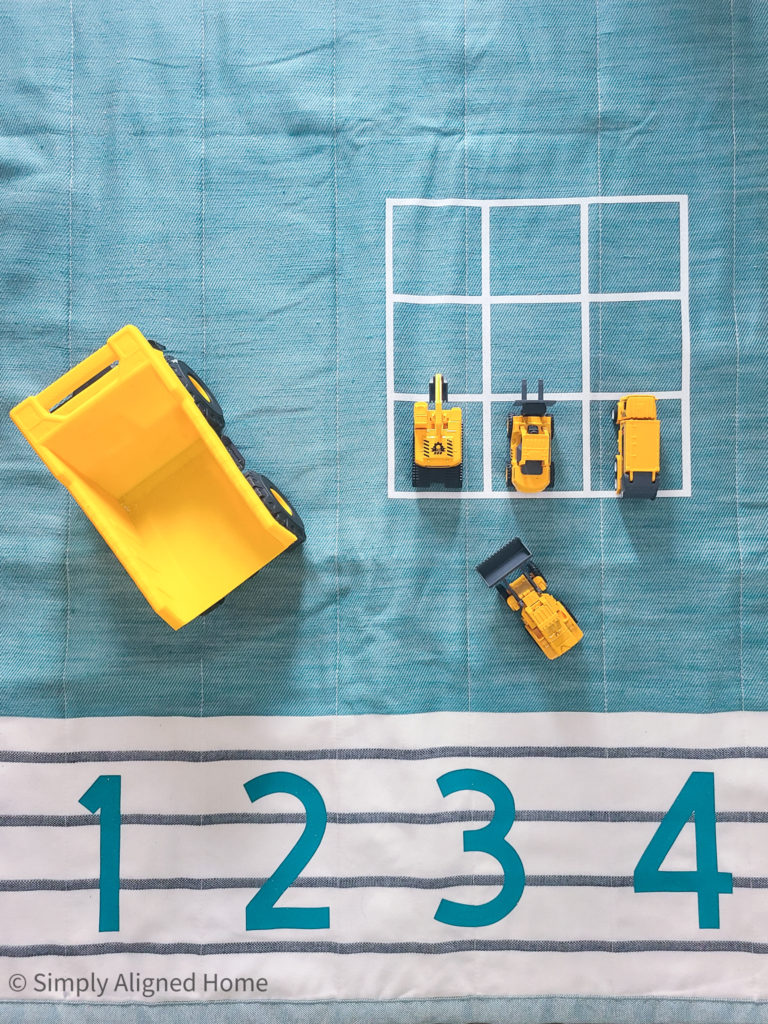
I was able to make the Tic Tac Toe boards big enough for large playing pieces, yet small enough to fit on one 12″x19″ roll of Glitter Iron-On. I also used my 12″ x 24″ StandardGrip Machine Mat to cut them out.
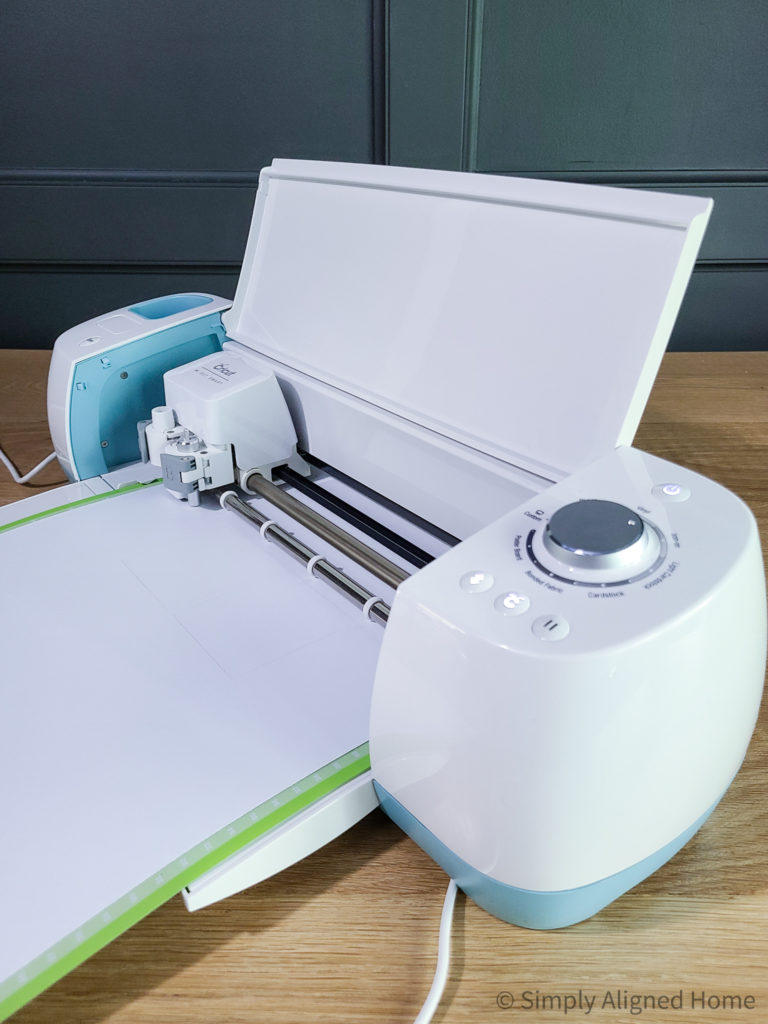
The Cricut Explore Air is perfect for larger projects and still cuts the designs really quick! One of the main differences between the Cricut Explore Air and Cricut Joy is that you have to select the material that you are using on the Explore Air. There is a dial on the machine, as well as buttons to feed your material and begin the cut.
Checkerboard Using Cricut Explore Air
The last game board that I wanted to add to the activity mat was a checkerboard! My oldest son is finally old enough to play games like this…and I figured my other two boys could use it as parking spaces for their cars. My husband was very excited about the idea of playing checkers with our son, so I knew I needed to add it to the activity mat!
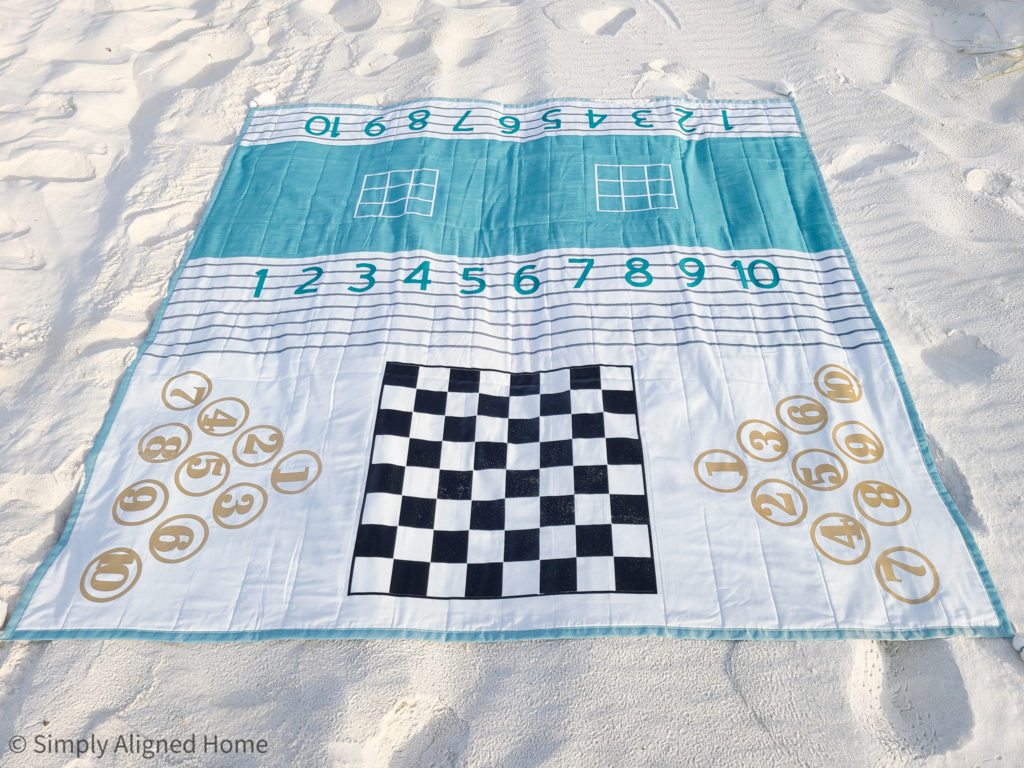
We already own a large checkerboard set, so I wanted to make the board large enough for the pieces to fit. I used my Explore Air again for this, but had to piece it together. I used a checkerboard image from the Cricut image library and added a border to it. I made the overall board roughly 23″ wide in order to fit on two 12″ x 24″ rolls of Everyday Iron-On. I then used the “Slice” command to separate it into two different images.
One thing to note about ironing on two different images next to each other like this is that you shouldn’t remove the plastic film until both are ironed on to the mat.
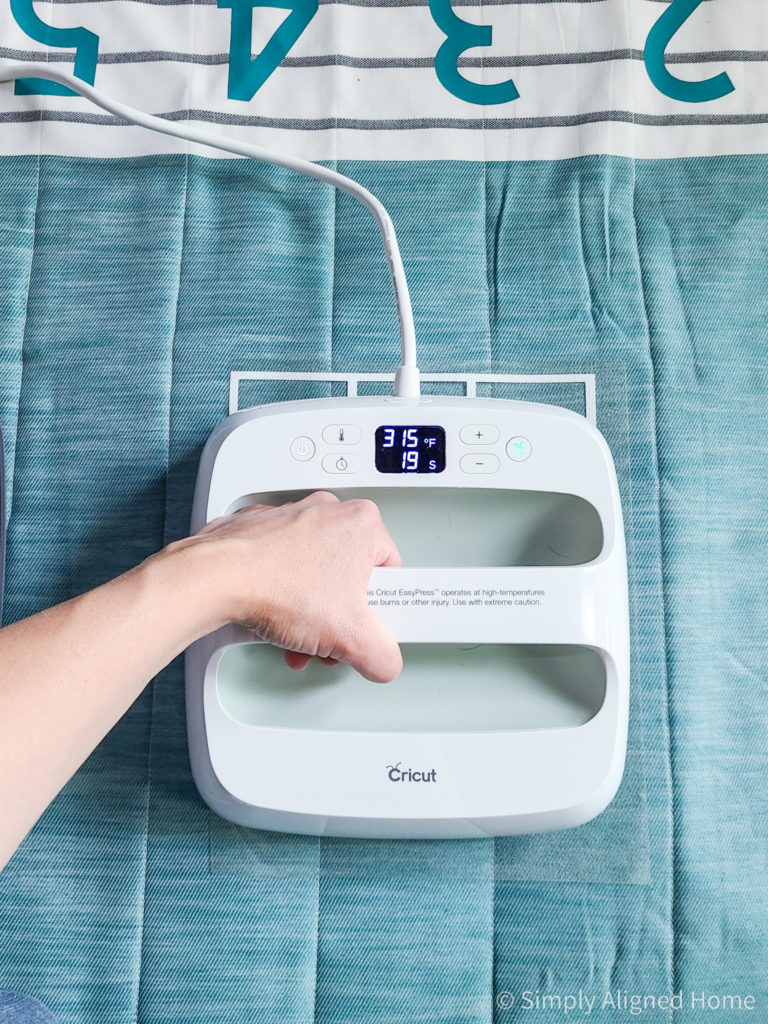
Cricut EasyPress 2 and EasyPress Mat
Another game changer…the Cricut EasyPress 2! I have only ever used a traditional iron when using iron-on materials. While an iron does work, the Cricut EasyPress 2 works so much better!
If you go to cricut.com/ep-settings, you can get detailed instructions on how to apply your iron-on. You simply select the heat-transfer material and base material. It will generate the temperature setting and amount of time to apply the heat.
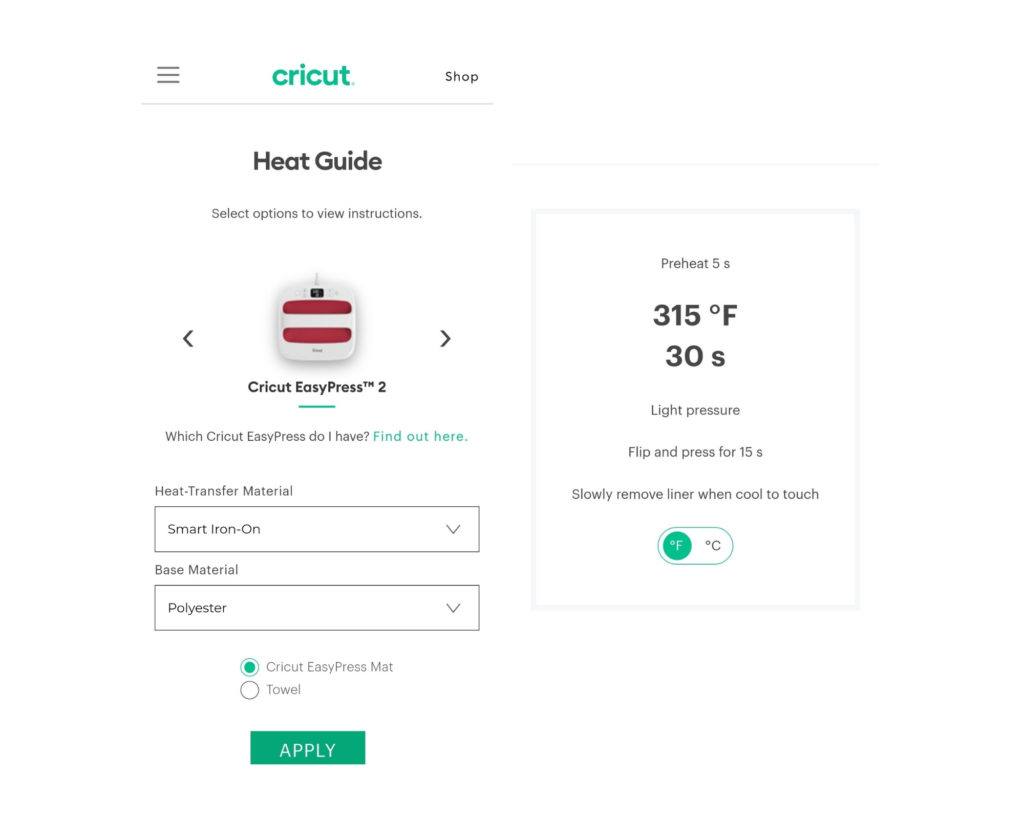
If that weren’t enough, it will also tell you the supplies that you need as well as how to prep and care for the material! Cricut has it figured out!!
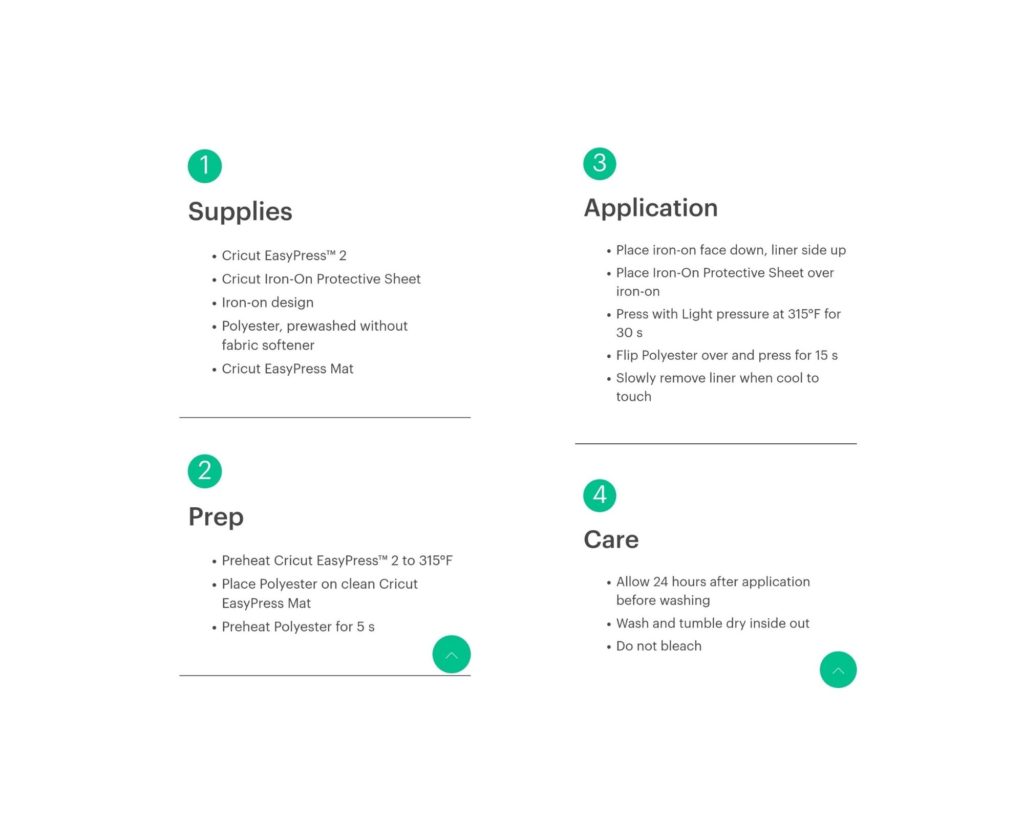
I have two pieces of advice for the iron-on application. One: Follow the instructions! Do not be afraid to apply the heat for the amount of time requested. For some reason, I’m always afraid that I’m going to melt the material or burn the mat. The application is best if you just follow the instructions!
Two: Allow the iron-on material to fully cool before trying to remove the plastic. It will not stay in place if you try to remove it before it is cool.
Enjoy!
This outdoor activity mat really was easy and so much fun to make!
We were able to enjoy it on a recent beach trip and I was so thankful that I had it! The entire family enjoyed it!

Tools, Materials and Images Used
**This post contains affiliate links to products that I recommend. If you purchase something through an affiliate link, I may receive a small percentage of the sale at no extra cost to you. I really appreciate your support.**
- Cricut Explore Air
- Cricut StandardGrip Machine Mat, 12″ x 24″
- Cricut Joy
- Cricut EasyPress 2
- Cricut EasyPress Mat
- Cricut Starter Tool Set
- Cricut Joy Smart Iron-On Teal
- Cricut Joy Smart Iron-On Gold
- Cricut Glitter Iron-On White
- Cricut Everyday Iron-On Black
- Images
- Checker Board: #MBD5D0BE
- Tic Tac Toe: #M47351
- Numbers: Cricut Sans Font
- Number Circles 1-10: #MC20D5, #MC20D7, #MC20D8, #MC20DA, #MC20DB, #MC20DD, #MC20DF, #MC20E0, #MC2150, #MC2153
Awesome! Love 💕 it!
Thank you!! The kids really enjoyed it!